For most programs, the start-up process is roughly the same:
Log into COSMOS/(Dardel) via Thinlinc to start a HPC Desktop session.
Click Applications in the top left corner and hover over the items prefixed with Applications- until you find your desired application.
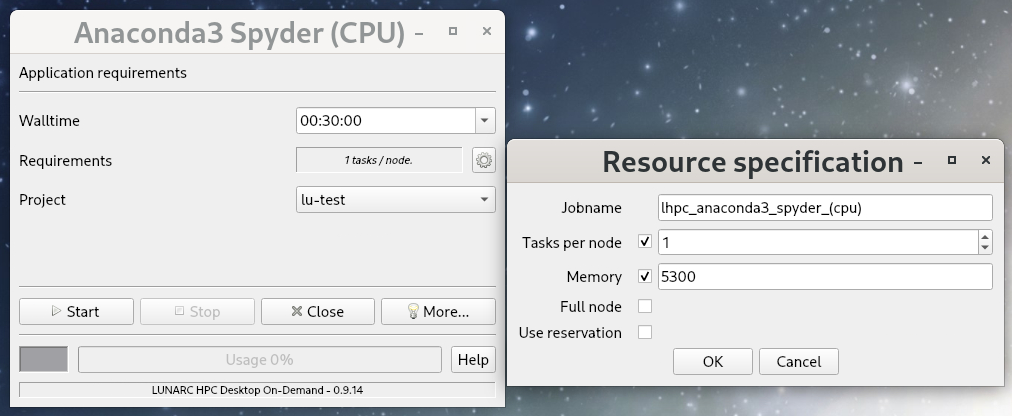
Upon clicking your chosen application, a pop-up, the Gfx Launcher interface, will appear and let you set the following options:
Wall time - how long your interactive session will remain open. When it ends, the whole window closes immediately and any unsaved work is lost. You can select the time from a drop-down menu, or type in the time manually. CPU-only applications can run for up to 168 hours (7 days), but the rest are limited to 48 hours. Default is 30 minutes.
Requirements - how many tasks per node you need. The default is usually 1 or 4 tasks per node. There is also a gear icon to the right of this box that can pull up a second menu where you can set the name of your job, the number of tasks per node, the amount of memory per CPU core, and/or toggle whether or not to use a full node.
Resource - which kind of node you want in terms of the architecture (AMD or Intel) and number of cores in the CPU (or GPU). Options and defaults vary by program, but it is recommended that you leave the default node type in place.
Project - choose from a drop-down menu the project with which your work is associated. This is mainly to keep your usage in line with your licenses and permissions, and to send any applicable invoices to the correct PI. Licensed software will only work for projects whose group members are covered by the license.
The GfxLauncher GUI (here used to launch Spyder). The box on the left is the basic menu and the box on the right is what pops up when the gear icon next to Requirements is clicked.
When you’re happy with your settings, click “Start”. The Gfx Launcher menu will stay open in the background so that you can monitor your remaining time and resources with the Usage bar.
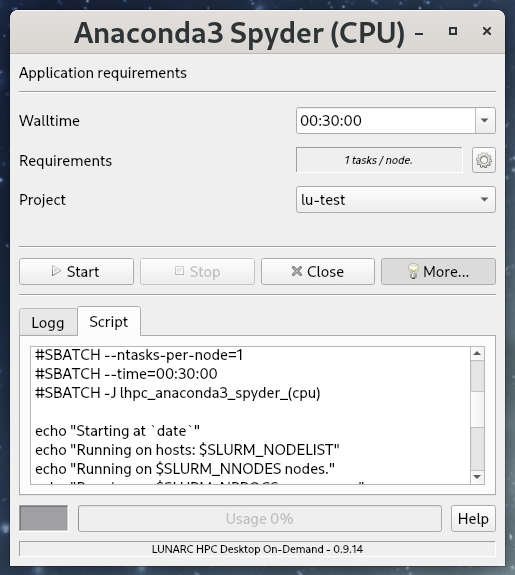
If you want, you can also look at the associated SLURM scripts by clicking the “More” button at the bottom of the Gfx Launcher menu and clicking the “Script” tab (example below), or view the logs under the “Logg” tab.
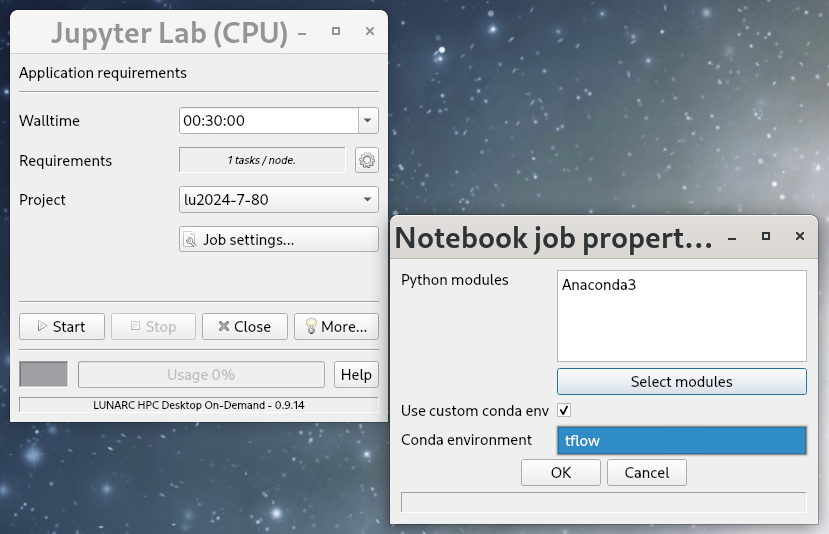
For a few applications (e.g. Jupyter Lab), GfxLauncher will also offer an additional menu item titled Jobsettings.... This is where you can load custom environments or additional modules if absolutely necessary. However, this feature is still a work in progress; any module already in the module box when you first open Jobsettings is likely necessary to run the program, and searching for additional modules (Select modules button) tends to erase any listed previously. For now, additional modules must be entered by hand (not always including the version number) in a comma-separated list. Moreover, incompatible and redundant modules tend to make the application shut down as soon as it is queued, raising a spurious alert that the requested walltime has expired.
The Job Properties menu (right) pops up when the box titled Jobsettings... in the main GfxLauncher window (left) is clicked. Only use it if you know what you’re doing!
To start an interactive session in the simplest way, is shown here:
Use:
interactive -A [project_name]
Where [project_name] is the UPPMAX project name,
for example interactive-Auppmax2025-2-393.
The output will look similar to this:
[richel@rackham4 ~]$ interactive-Auppmax2025-2-393
You receive the high interactive priority.You may run for at most one hour.Your job has been put into the devcore partition and is expected to start at once.(Please remember, you may not simultaneously have more than one devel/devcore job, running or queued, in the batch system.)Please, use no more than 8 GB of RAM.salloc: Pending job allocation 9093699salloc: job 9093699 queued and waiting for resourcessalloc: job 9093699 has been allocated resourcessalloc: Granted job allocation 9093699salloc: Waiting for resource configurationsalloc: Nodes r314 are ready for job _ _ ____ ____ __ __ _ __ __| | | | _ \| _ \| \/ | / \ \ \/ / | System: r314| | | | |_) | |_) | |\/| | / _ \ \ / | User: richel| |_| | __/| __/| | | |/ ___ \ / \ | \___/|_| |_| |_| |_/_/ \_\/_/\_\ |############################################################################### User Guides: https://docs.uppmax.uu.se/ Write to support@uppmax.uu.se, if you have questions or comments.[richel@r314 ~]$
Note that the prompt has changed to show that one is on an interactive node.
salloc -A [project_name]
Where [project_name] is the HPC2N project name,
for example salloc-Ahpc2n2025-151.
This will look similar to this (including asking for resources - time is required):
b-an01 [~]$ salloc -n 4 --time=00:10:00 -A hpc2n2025-151salloc: Pending job allocation 20174806salloc: job 20174806 queued and waiting for resourcessalloc: job 20174806 has been allocated resourcessalloc: Granted job allocation 20174806salloc: Waiting for resource configurationsalloc: Nodes b-cn0241 are ready for jobb-an01 [~]$ module load GCC/12.3.0 Python/3.11.3b-an01 [~]$
interactive -A [project_name]
Where [project_name] is the LUNARC project name,
for example interactive-Alu2025-7-106.
This will look similar to this (including asking for resources - time is required):
[bbrydsoe@cosmos3 ~]$ interactive-Alu2025-7-106-n4-t00:10:00
Cluster name: COSMOSWaiting for JOBID 988025 to start