Using GPUs with Python
Questions
What is GPU acceleration?
How to enable GPUs (for instance with CUDA) in Python code?
How to deploy GPUs at HPC2N, UPPMAX, LUNARC, NSC, PDC and C3SE?
Objectives
Get an intro to common schemes for GPU code acceleration
Learn about the GPU nodes at HPC2N, UPPMAX, LUNARC, NSC, PDC, and C3SE
Learn how to make a batch script asking for GPU nodes at HPC2N, UPPMAX, LUNARC, NSC, PDC, and C3SE
Introduction
In order to understand the capabilities of a GPU, it is instructive to compare a pure CPU architecture with a GPU based architecture. Here, there is a schematics of the former:
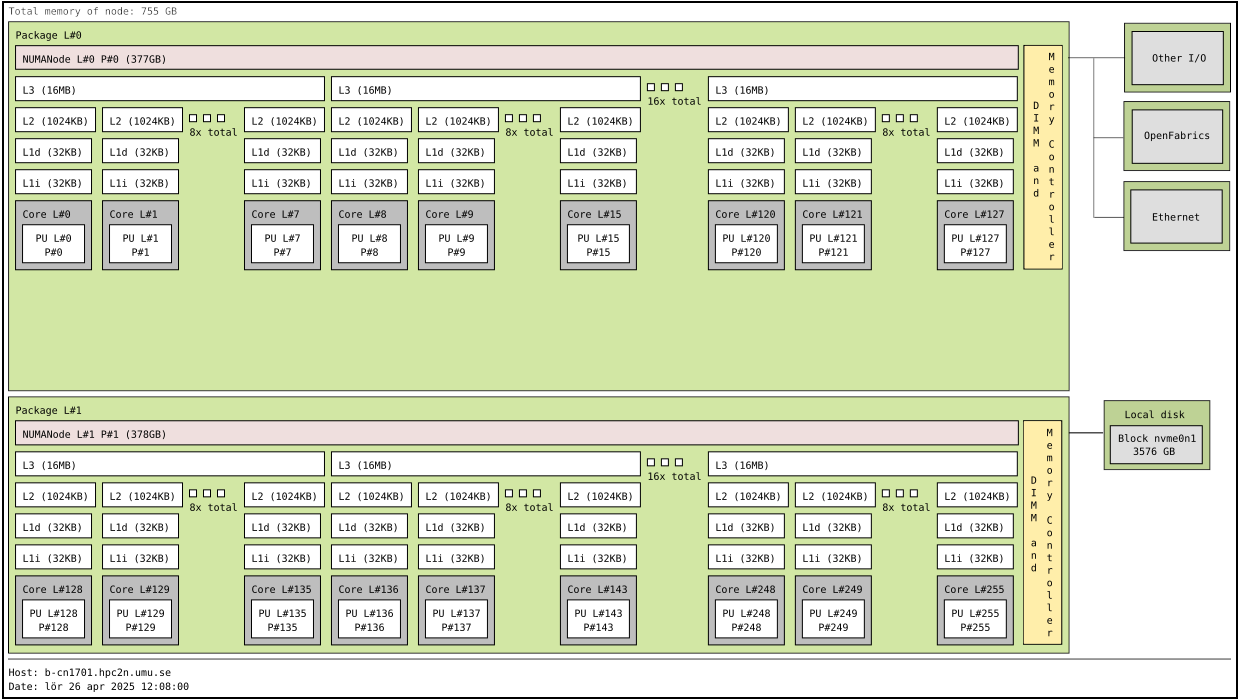
Pure CPU architecture (single node). In the present case there are 256 cores, each with its own cache memory (LX). There is a shared memory (~378 GB/NUMA node) for all these cores. This is an AMD Zen4 node. The base frequency is 2.25 GHz, but it can boost up to 3.1 GHz.
As for the GPU architecture, a GPU card of type Ada Lovelace (like the L40s) looks like this:
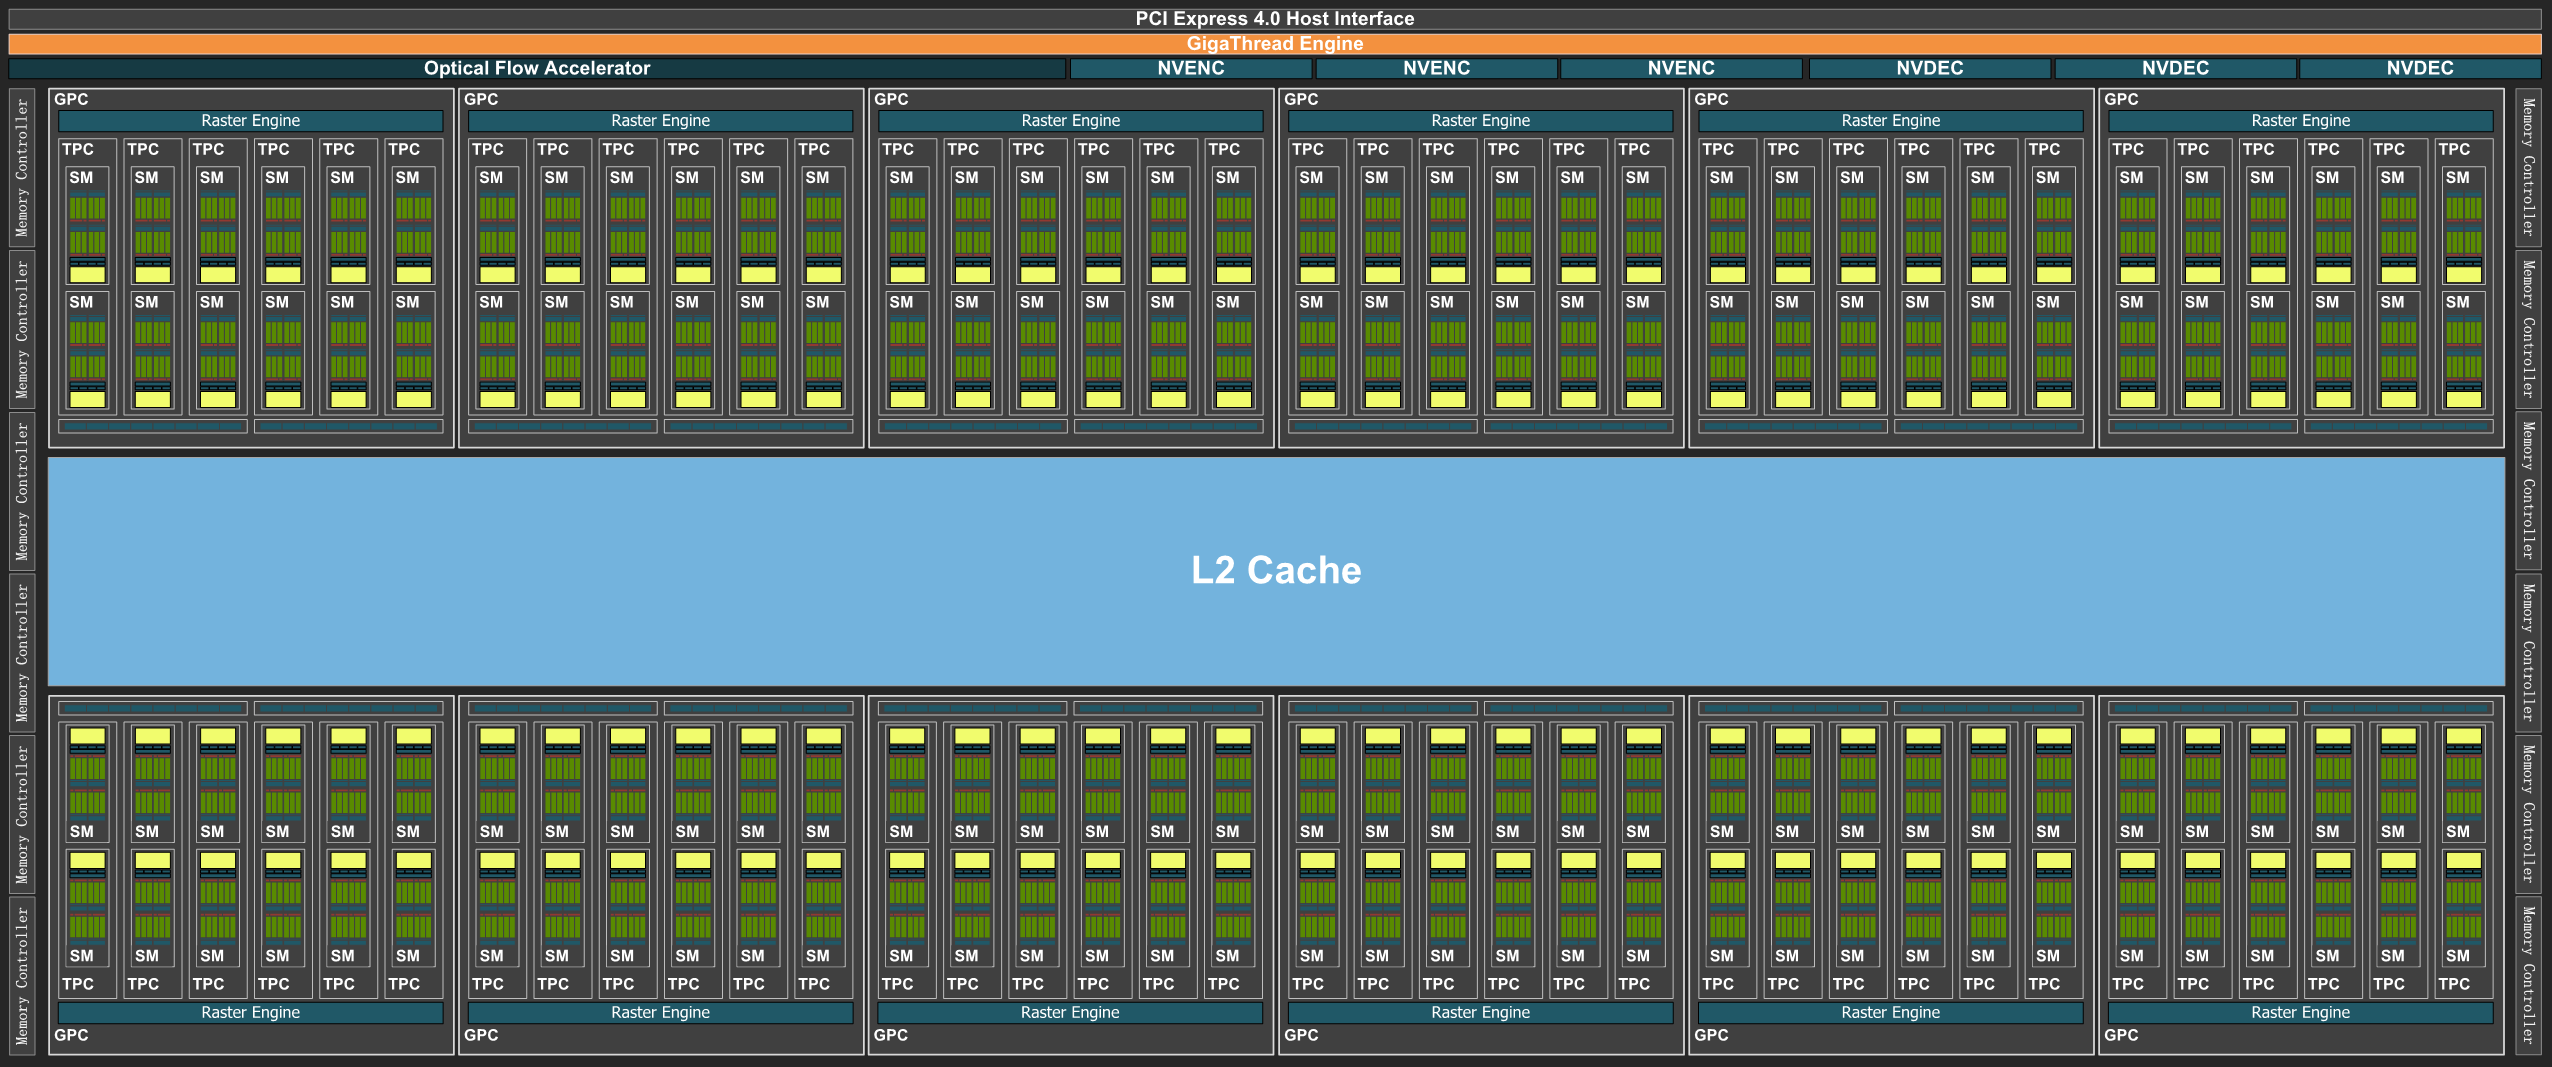
Note: The AD102 GPU also includes 288 FP64 Cores (2 per SM) which are not depicted in the above diagram. The FP64 TFLOP rate is 1/64th the TFLOP rate of FP32 operations. The small number of FP64 Cores are included to ensure any programs with FP64 code operate correctly, including FP64 Tensor Core code. This is a single GPU engine of a L40s card. There are 12 Graphics Processing Clusters (GPCs), 72 Texture Processing Clusters (TPCs), 144 Streaming Multiprocessors (SMs), and a 384-bit memory interface with 12 32-bit memory controllers). On the diagram, each green dot represents a CUDA core (single precision), while the yellow are RT cores and the blue Tensor cores. The cores are arranged in the slots called SMs in the figure. Cores in the same SM share some local and fast cache memory.
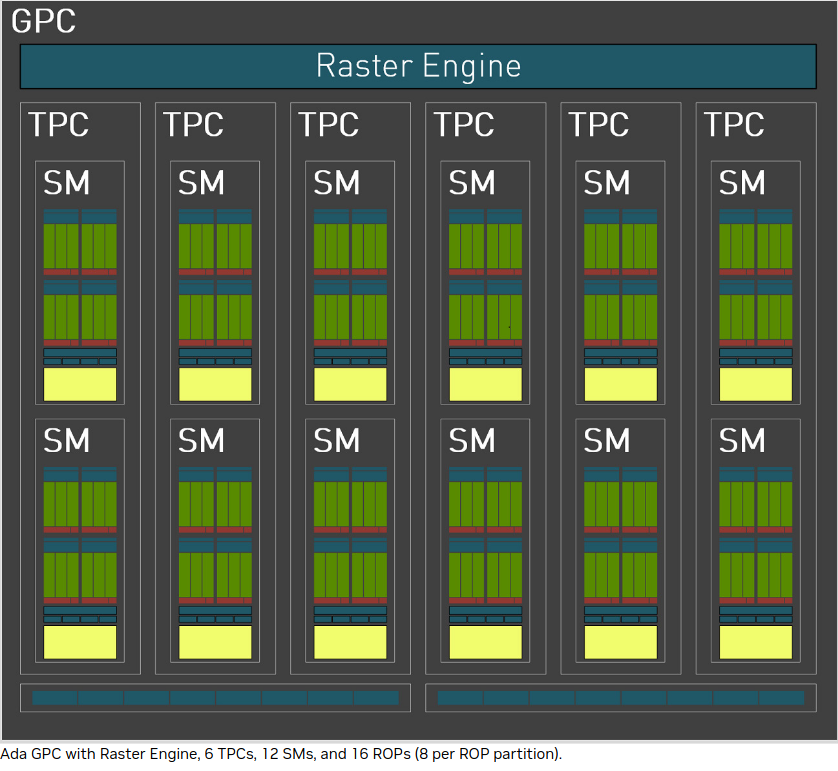
The GPC is the dominant high-level hardware block. Each GPC includes a dedicated Raster Engine, two Raster Operations (ROPs) partitions, with each partition containing eight individual ROP units, and six TPCs. Each TPC includes one PolyMorph Engine and two SMs. Each SM contain 128 CUDA Cores, one Ada Third-Generation RT Core, four Ada Fourth-Generation Tensor Cores, four Texture Units, a 256 KB Register File, and 128 KB of L1/Shared Memory, which can be configured for different memory sizes depending on the needs of the graphics or compute workload.
In a typical cluster, some GPUs are attached to a single node resulting in a CPU-GPU hybrid architecture. The CPU component is called the host and the GPU part the device. One possible layout (Kebnekaise, AMD Zen4 node with L40s GPU) is as follows:
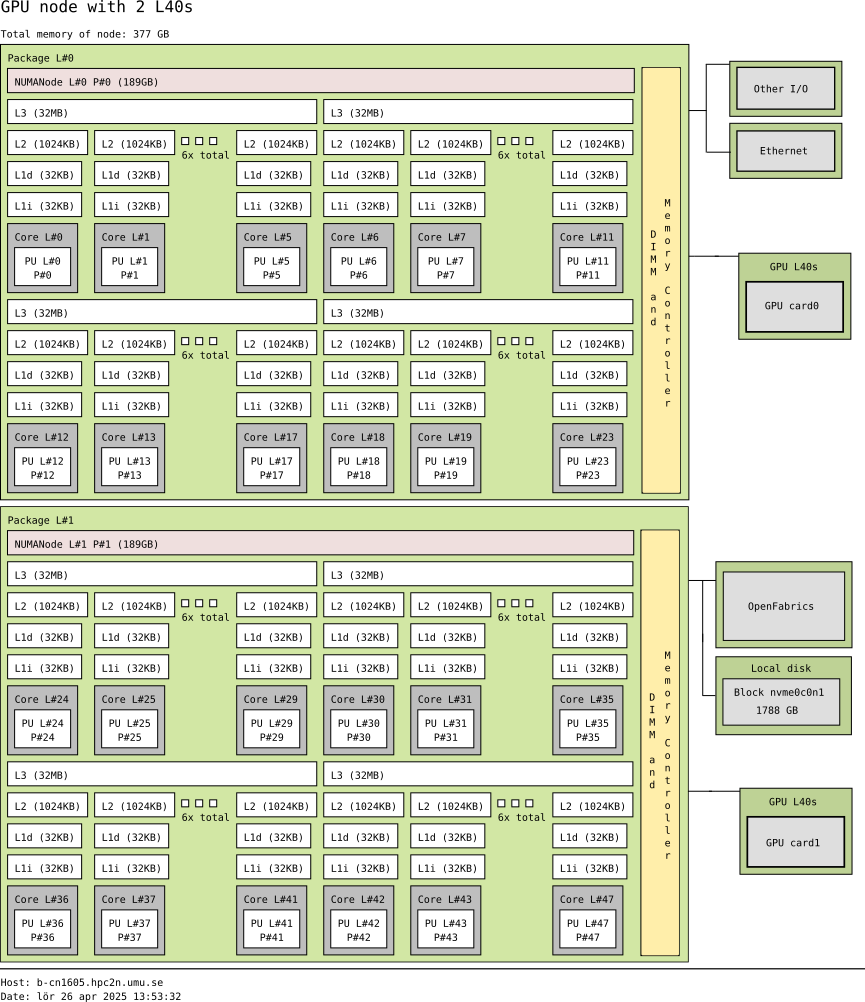
Schematics of a hybrid CPU-GPU architecture. A GPU L40s card is attached to a NUMA island which in turn contains 24 cores (AMD Zen4 CPU node with 48 cores total). The NUMA island and the GPUs are connected through a PCI-E interconnect which makes the data transfer between both components rather slow.
We can characterize the CPU and GPU performance with two quantities: the latency and the throughput.
Latency refers to the time spent in a sole computation.
Throughput denotes the number of computations that can be performed in parallel. Then, we can say that a CPU has low latency (able to do fast computations) but low throughput (only a few computations simultaneously).
In the case of GPUs, the latency is high and the throughput is also high. We can visualize the behavior of the CPUs and GPUs with cars as in the figure below. A CPU would be compact road where only a few racing cars can drive whereas a GPU would be a broader road where plenty of slow cars can drive.
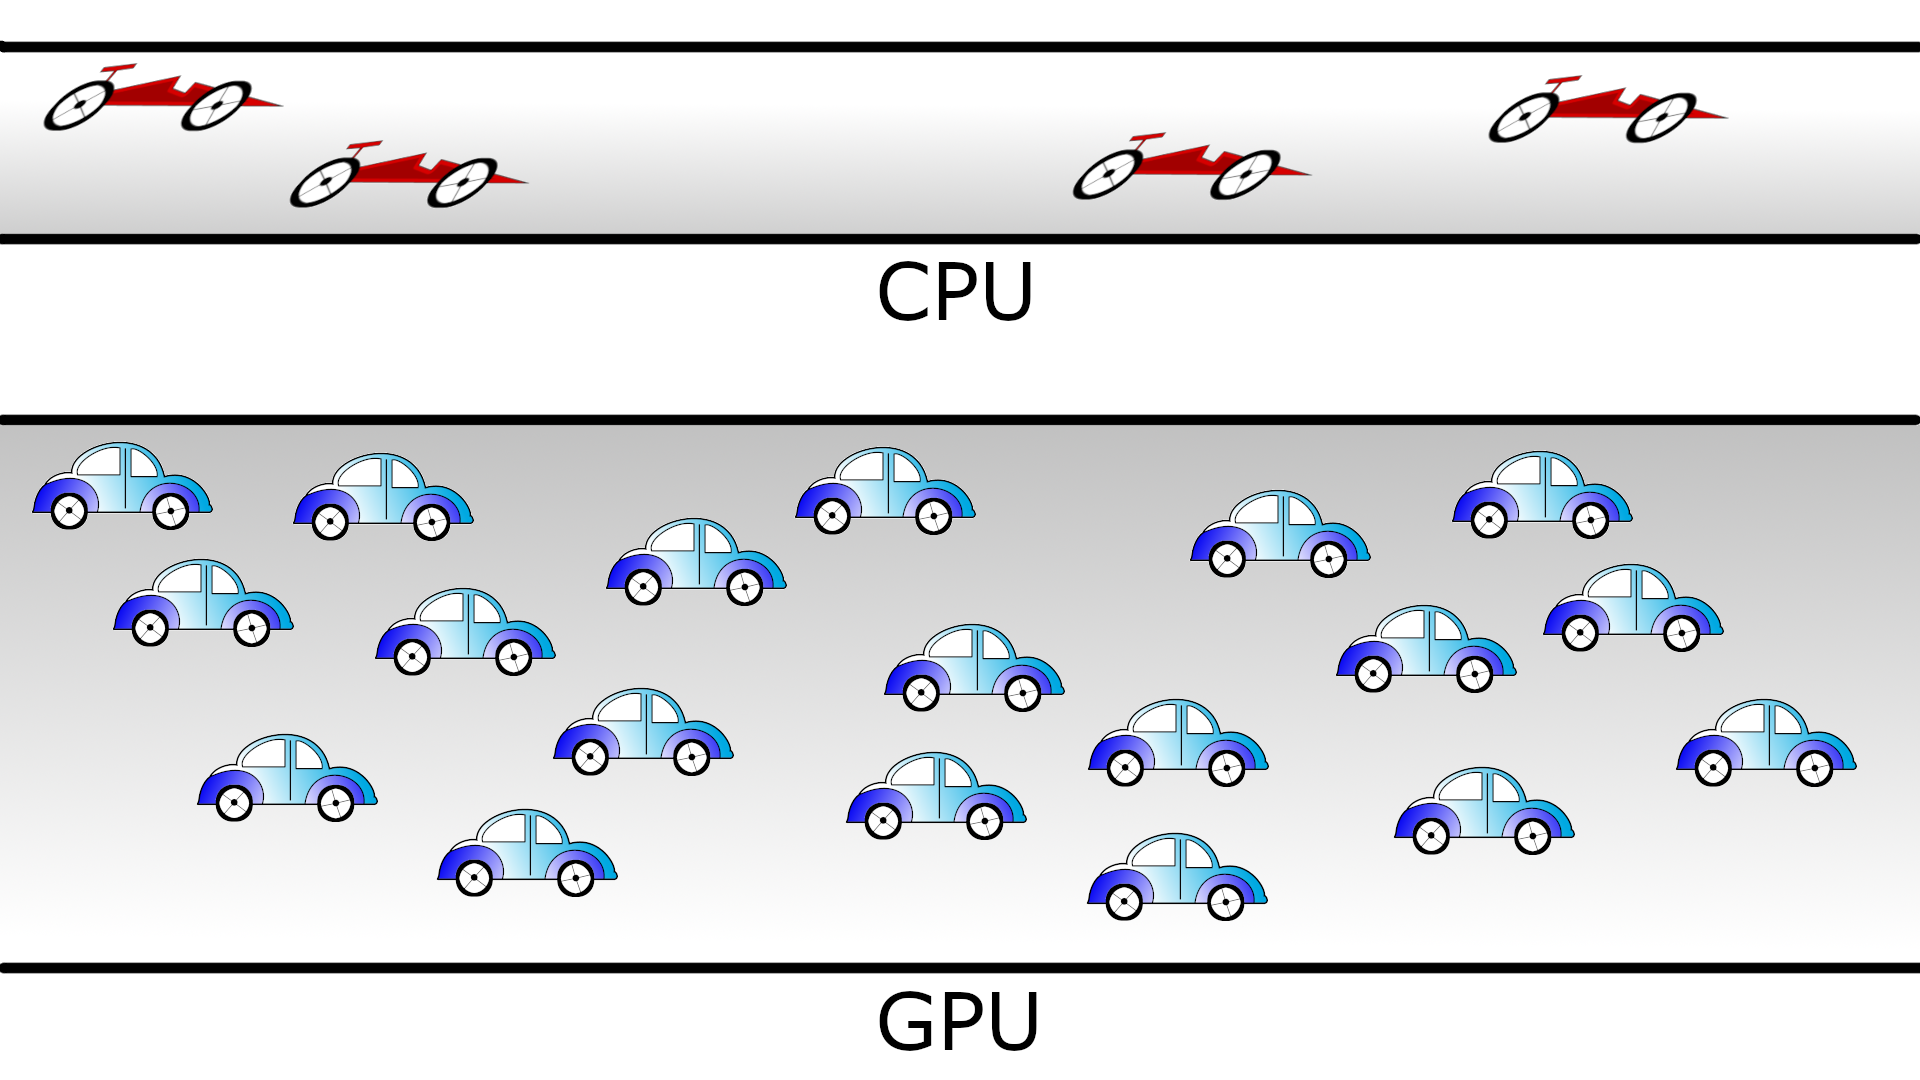
Cars and roads analogy for the CPU and GPU behavior. The compact road is analogous to the CPU (low latency, low throughput) and the broader road is analogous to the GPU (high latency, high throughput).
Not every Python program is suitable for GPU acceleration. GPUs process simple functions rapidly, and are best suited for repetitive and highly-parallel computing tasks. GPUs were originally designed to render high-resolution images and video concurrently and fast, but since they can perform parallel operations on multiple sets of data, they are also often used for other, non-graphical tasks. Common uses are machine learning and scientific computation were the GPUs can take advantage of massive parallelism.
Many Python packages are not CUDA aware, but some have been written specifically with GPUs in mind. If you are usually working with for instance NumPy and SciPy, you could optimize your code for GPU computing by using CuPy which mimics most of the NumPy functions. Another option is using Numba, which has bindings to CUDA and lets you write CUDA kernels in Python yourself. This means you can use custom algorithms. This is for NVidia GPUs. On AMD GPUs you would use HIP.
One of the most common use of GPUs with Python is for machine learning or deep learning. For these cases you would use something like Tensorflow or PyTorch libraries which can handle CPU and GPU processing internally without the programmer needing to do so. We will talk more about that later in the course.
GPUs on UPPMAX, HPC2N, LUNARC, NSC, PDC, and C3SE systems
There are generally either not GPUs on the login nodes or they cannot be accessed for computations. To use them you need to either launch an interactive job or submit a batch job.
The new cluster Pelle has GPUs. L40s GPUs (up to 10 GPU cards) and H100 GPUs (up to 2 GPU cards).
You need to use this batch command (number of cards is depending on type):
for L40s GPUs (up to 10 GPU cards):
#SBATCH -p gpu
#SBATCH --gpus=l40s:<number of GPUs>
for H100 GPUs (up to 2 GPU cards):
#SBATCH -p gpu
#SBATCH --gpus=h100:<number of GPUs>
Kebnekaise’s GPU nodes are considered a separate resource, and the regular compute nodes do not have GPUs.
Kebnekaise has a great many different types of GPUs:
V100 (2 cards/node)
A40 (8 cards/node)
A6000 (2 cards/node)
L40s (2 or 6 cards/node)
A100 (2 cards/node)
H100 (4 cards/node)
MI100 (2 cards/node)
To access them, you need to use this to use the batch system:
#SBATCH --gpus=x
where x is the number of GPU cards you want. Above are given how many are on each type, so you can ask for up to that number.
In addition, you need to add this to use the batch system:
#SBATCH -C <type>
where type is
v100
a40
a6000
l40s
a100
h100
mi100
For more information, see HPC2N’s guide to the different parts of the batch system: https://docs.hpc2n.umu.se/documentation/batchsystem/resources/
LUNARC has Nvidia A100 GPUs and Nvidia A40 GPUs, but the latter ones are reserved for interactive graphics work on the on-demand system, and Slurm jobs should not be submitted to them.
Thus in order to use the A100 GPUs on Cosmos, add this to your batch script:
A100 GPUs on AMD nodes:
#SBATCH -p gpua100
#SBATCH --gres=gpu:1
These nodes are configured as exclusive access and will not be shared between users. User projects will be charged for the entire node (48 cores). A job on a node will also have access to all memory on the node.
A100 GPUs on Intel nodes:
#SBATCH -p gpua100i
#SBATCH --gres=gpu:<number>
where <number> is 1 or 2 (Two of the nodes have 1 GPU and two have 2 GPUs).
Tetralith has Nvidia T4 GPUs. In order to access them, add this to your batch script or interactive job:
#SBATCH -n 1
#SBATCH -c 32
#SBATCH --gpus-per-task=1
Dardel has 4 AMD Instinct™ MI250X á 2 GCDs per node on 62 nodes on its GPU partition.
You need to add this to your batch script or interactive job in order to access them:
#SBATCH -N 1
#SBATCH --ntasks-per-node=1
#SBATCH -p gpu
In addition, Dardel has 8 Grace Hopper nodes on its GPU-GH partition, where each has four NVIDIA Grace Hopper (H100) GPUs and four NVIDIA Grace ARM CPUs—totalling 32 Grace Hopper Superchips.
You need to add this to your batch script or interactive job in order to access them:
#SBATCH -p gpugh
#SBATCH --nodes=1
warning
You need to apply for the GPU and GPU-GH resources in your project in order to use these partitions.
Alvis is meant for GPU jobs.
There is no node-sharing on multi-node jobs (--exclusive is automatic).
NOTE: Requesting -N 1 does not mean 1 full node
You would need to add this to your batch script:
#SBATCH -p alvis
#SBATCH -N <nodes>
#SBATCH --gpus-per-node=<type>:x
where <type> is one of
V100
T4
A100
and x is number of GPU cards
1-4 for V100
1-8 for T4
1-4 for A100
Numba example
Numba is installed on some of the centers as a module (HPC2N, LUNARC, and C3SE). For UPPMAX and NSC we’ll use virtual environments.
NOTE
PDC/Dardel has AMD GPUs and numba after version 0.53.1 only has compatibility with CUDA. The numba 0.53.1 version is too old to work with anything else installed.
The GPU-GH partition on PDC/Dardel has Nvidia Grace Hopper nodes which each has four NVIDIA Grace Hopper (H100) GPUs and four NVIDIA Grace ARM CPUs. However, the course project does not have an allocation on this. It is similar to what Arrhenius has, so next time this course runs there will be an example for this!
Thus, no numba example for PDC. You can try and play around with the hip example (marked with hip in the name) in the Exercises/examples/programs folder. There is also an example batch scripts for GPUs on Dardel in the Exercises/examples/pdc folder, which you can try with.
Note that you need to install hip-python in a virtual environment to get any of it to work.
We are going to use the following program for testing on the machines (minus Dardel). It was taken from a (now absent) linuxhint.com exercise but there are also many great examples at https://numba.readthedocs.io/en/stable/cuda/examples.html):
Python example add-list.py using Numba
import numpy as np
from timeit import default_timer as timer
from numba import vectorize

# This should be a substantially high value.
NUM_ELEMENTS = 100000000

# This is the CPU version.
def vector_add_cpu(a, b):
  c = np.zeros(NUM_ELEMENTS, dtype=np.float32)
  for i in range(NUM_ELEMENTS):
      c[i] = a[i] + b[i]
  return c

# This is the GPU version. Note the @vectorize decorator. This tells
# numba to turn this into a GPU vectorized function.
@vectorize(["float32(float32, float32)"], target='cuda')
def vector_add_gpu(a, b):
  return a + b;

def main():
  a_source = np.ones(NUM_ELEMENTS, dtype=np.float32)
  b_source = np.ones(NUM_ELEMENTS, dtype=np.float32)

  # Time the CPU function
  start = timer()
  vector_add_cpu(a_source, b_source)
  vector_add_cpu_time = timer() - start

  # Time the GPU function
  start = timer()
  vector_add_gpu(a_source, b_source)
  vector_add_gpu_time = timer() - start

  # Report times
  print("CPU function took %f seconds." % vector_add_cpu_time)
  print("GPU function took %f seconds." % vector_add_gpu_time)

  return 0

if __name__ == "__main__":
  main()
As before, we need a batch script to run the code. There are no GPUs on the login node and even if there were we should not run long/heavy jobs there.
Note Type along!
Running a GPU Python code interactively on Pelle.
$[bbrydsoe@pelle2 ~] salloc -A uppmax2025-2-393 -t 00:30:00 -n 2 -p gpu --gpus=l40s:1
salloc: Pending job allocation 406444
salloc: job 406444 queued and waiting for resources
salloc: job 406444 has been allocated resources
salloc: Granted job allocation 406444
salloc: Waiting for resource configuration
salloc: Nodes p202 are ready for job
[bbrydsoe@p202 ~]$ module load Python/3.13.5 foss/2025b CUDA/13.0.2
[bbrydsoe@p202 ~]$ source /sw/arch/local/software/python/venvs/numba-gpu/bin/activate
[bbrydsoe@p202 ~]$ python add-list.py
CPU function took 17.475140 seconds.
GPU function took 0.134774 seconds.
Running a GPU Python code on Pelle.
#!/bin/bash
# Remember to change this to your own project ID after the course!
#SBATCH -A uppmax2025-2-393
# We are asking for 5 minutes
#SBATCH --time=00:05:00
# Asking for one L40s GPU
#SBATCH -p gpu
#SBATCH --gpus=l40s:1

module load Python/3.13.5 foss/2025b CUDA/13.0.2
source /sw/arch/local/software/python/venvs/numba-gpu/bin/activate

python add-list.py
Running a GPU Python code interactively.
$ salloc -A hpc2n2026-002 --time=00:30:00 -n 1 --gpus=1 -C l40s
salloc: Pending job allocation 32126787
salloc: job 32126787 queued and waiting for resources
salloc: job 32126787 has been allocated resources
salloc: Granted job allocation 32126787
salloc: Waiting for resource configuration
salloc: Nodes b-cn1606 are ready for job
$ module load GCC/12.3.0 Python/3.11.3 OpenMPI/4.1.5 SciPy-bundle/2023.07 CUDA/12.1.1 numba/0.58.1
$ srun python add-list.py
CPU function took 14.216318 seconds.
GPU function took 0.390335 seconds.
Batch script, add-list.sh, to run the same GPU Python script (the numba code, add-list.py) at Kebnekaise.
As before, submit with sbatch add-list.sh (assuming you called the batch script thus - change to fit your own naming style).
#!/bin/bash
# Remember to change this to your own project ID after the course!
#SBATCH -A hpc2n2026-002     # HPC2N ID - change to your own
# We are asking for 5 minutes
#SBATCH --time=00:05:00
#SBATCH -n 1
# Asking for one L40s GPU
#SBATCH --gpus=1
#SBATCH -C l40s

# Remove any loaded modules and load the ones we need
module purge  > /dev/null 2>&1
module load GCC/12.3.0 Python/3.11.3 OpenMPI/4.1.5 SciPy-bundle/2023.07 CUDA/12.1.1 numba/0.58.1

# Run your Python script
python add-list.py
Batch script, “add-list.sh”, to run the same GPU Python script (the numba code, “add-list.py”) at Cosmos. As before, submit with “sbatch add-list.sh” (assuming you called the batch script thus - change to fit your own naming style).
#!/bin/bash
# Remember to change this to your own project ID after the course!
#SBATCH -A lu2026-7-57
# We are asking for 5 minutes
#SBATCH --time=00:05:00
#SBATCH --ntasks-per-node=1
# Asking for one A100 GPU
#SBATCH -p gpua100
#SBATCH --gres=gpu:1

# Remove any loaded modules and load the ones we need
module purge  > /dev/null 2>&1
module load GCC/12.3.0  Python/3.11.3 OpenMPI/4.1.5 numba/0.58.1 SciPy-bundle/2023.07 CUDA/12.1.1

# Run your Python script
python add-list.py
Batch script, “add-list.sh”, to run the same GPU Python script (the numba code, “add-list.py”) at Alvis. As before, submit with “sbatch add-list.sh” (assuming you called the batch script thus - change to fit your own naming style).
#!/bin/bash
# Remember to change this to your own project ID after the course!
#SBATCH -A naiss2026-4-66
# We are asking for 10 minutes
#SBATCH -t 00:10:00
#SBATCH -p alvis
#SBATCH -N 1 --gpus-per-node=T4:2
# Writing output and error files
#SBATCH --output=output%J.out
#SBATCH --error=error%J.error

# Load any needed GPU modules and any prerequisites - on Alvis this module loads all
ml purge > /dev/null 2>&1
module load numba-cuda/0.20.0-foss-2025b-CUDA-12.9.1
python add-list.py
Batch script, “add-list.sh”, to run the same GPU Python script (the numba code, “add-list.py”) at Tetralith. As before, submit with “sbatch add-list.sh” (assuming you called the batch script thus - change to fit your own naming style).
#!/bin/bash
# Remember to change this to your own project ID after the course!
#SBATCH -A naiss2026-4-66
# We are asking for 5 minutes
#SBATCH --time=00:05:00
#SBATCH -n 1
#SBATCH -c 32
#SBATCH --gpus-per-task=1

# Remove any loaded modules and load the ones we need
module purge  > /dev/null 2>&1
module load Python/3.11.5-bare-hpc1-gcc-2023b-eb
module load buildenv-gcccuda/12.9.1-gcc11-hpc1

# If you are running this during the course, you can use the venv we have created for you
source /proj/courses-fall-2025/numba-gpu/bin/activate
# Otherwise, you have to create a virtual environment to use, then comment out the above
# Create a virtual environment to use. Do this before submitting the job
# cd /proj/courses-fall-2025/users/<mydir>
# module load Python/3.11.5-bare-hpc1-gcc-2023b-eb
# module load buildenv-gcccuda/12.9.1-gcc11-hpc1
# python3 -m venv numba-gpu
# source numba-gpu/bin/activate
# pip3 install --upgrade pip setuptools wheel
# pip3 install numba-cuda\[cu13\] numpy
# Then in the batch script, you load it
# source /proj/courses-fall-2025/users/<mydir>/numba-gpu/bin/activate
# Remove the comment of the above line if you created your own venv

# Run your Python script
python add-list.py
This is what I got for Tetralith:
CPU function took 23.191229 seconds. GPU function took 2.931487 seconds.
An example for Dardel/PDC
This example is for a HIP (heterogeneous interface for portability) code, since most of Dardel’s GPU’s are AMD and not Nvidia - as mentioned above.
We will use the example HIP C++ code “Hello_world_gpu.cpp” from wget https://raw.githubusercontent.com/PDC-support/introduction-to-pdc/master/example/hello_world_gpu.cpp
Running on Dardel AMD GPU partition
#!/bin/bash
# Remember to change this to your own project ID after the course!
#SBATCH -A naiss2026-4-66
# We are asking for 10 minutes
#SBATCH -t 10:00:00
#SBATCH -N 1
#SBATCH --ntasks-per-node=1
#SBATCH -p gpu

# Load the ROCm module and set the accelerator target to
# amd gfx90a  AMD MI250X GPU
ml rocm/6.3.3
ml craype-accel-amd-gfx90a

# We use the AMD hipcc compiler
# You can check the full path of the command hipcc:
# which hipcc
# This returns
# /opt/rocm-6.3.3/bin/hipcc

# You can compile it on the login node. Here we compile it in the
# batch script (normally don't do this)
hipcc --offload-arch=gfx90a hello_world_gpu.cpp -o hello_world_gpu.x

srun -n 1 ./hello_world_gpu.x
/*
==============================================================================
Hello world
Copyright (C) 2023  Henric Zazzi <hzazzi@kth.se>
This program is free software: you can redistribute it and/or modify
it under the terms of the GNU General Public License as published by
the Free Software Foundation, either version 3 of the License, or
(at your option) any later version.
This program is distributed in the hope that it will be useful,
but WITHOUT ANY WARRANTY; without even the implied warranty of
MERCHANTABILITY or FITNESS FOR A PARTICULAR PURPOSE.  See the
GNU General Public License for more details.
You should have received a copy of the GNU General Public License
along with this program.  If not, see <http://www.gnu.org/licenses/>.
==============================================================================
*/
#include <hip/hip_runtime.h>
#include <stdio.h>

// Kernel function that copies data string 1 -> string 2
__global__ void MyKernel(char* s1, char* s2) {
  int idx = blockIdx.x * blockDim.x + threadIdx.x;
  s2[idx] = s1[idx];
  }

int main(int argc, char** argv) {
  char hosts1[] = "hello world";
  char hosts2[11], *devs1, *devs2;
  size_t size = sizeof(hosts1);
  int ndevices, ndevice;

  // Get number of GPUs available
  if (hipGetDeviceCount(&ndevices) != hipSuccess) {
    printf("No such devices\n");
    return 1;
    }
  printf("You can access GPU devices: 0-%d\n", (ndevices - 1));
  ndevice = 0;
  if (argc > 1)
    ndevice = atoi(argv[1]);
  // Set default device to be used for subsequent hip API calls from this thread
  if (hipSetDevice(ndevice) != hipSuccess) {
    printf("Error initializing device %d\n", ndevice);
    return 1;
    }
  // Allocate memory on device
  hipMalloc(&devs1, size);
  hipMalloc(&devs2, size);
  // Copy data host -> device
  hipMemcpy(devs1, hosts1, size, hipMemcpyHostToDevice);
  // 3D-grid dimensions specifying the number of blocks to launch
  dim3 ngrid(1);
  // 3D-block dimensions specifying the number of threads in each block
  dim3 nblock(size);
  // Run kernel
  hipLaunchKernelGGL(MyKernel, ngrid, nblock, 0, 0, devs1, devs2);
  // Copy data device -> host
  hipMemcpy(hosts2, devs2, size, hipMemcpyDeviceToHost);
  // Free up memory
  hipFree(devs1);
  hipFree(devs2);
  printf("GPU %d: %s\n", ndevice, hosts2);
  }
Exercises
Integration 2D with Numba
An initial implementation of the 2D integration problem with the CUDA support for Numba could be as follows:
integration2d_gpu.py
from __future__ import division
from numba import cuda, float32
import numpy
import math
from time import perf_counter

# grid size
n = 100*1024
threadsPerBlock = 16
blocksPerGrid = int((n+threadsPerBlock-1)/threadsPerBlock)

# interval size (same for X and Y)
h = math.pi / float(n)

@cuda.jit
def dotprod(C):
    tid = cuda.threadIdx.x + cuda.blockIdx.x * cuda.blockDim.x

    if tid >= n:
        return

    #cummulative variable
    mysum = 0.0
    # fine-grain integration in the X axis
    x = h * (tid + 0.5)
    # regular integration in the Y axis
    for j in range(n):
        y = h * (j + 0.5)
        mysum += math.sin(x + y)

    C[tid] = mysum


# array for collecting partial sums on the device
C_global_mem = cuda.device_array((n),dtype=numpy.float32)

starttime = perf_counter()
dotprod[blocksPerGrid,threadsPerBlock](C_global_mem)
res = C_global_mem.copy_to_host()
integral = h**2 * sum(res)
endtime = perf_counter()

print("Integral value is %e, Error is %e" % (integral, abs(integral - 0.0)))
print("Time spent: %.2f sec" % (endtime-starttime))
Notice the larger size of the grid in the present case (100*1024) compared to the serial case’s size we used previously (10000). Large computations are necessary on the GPUs to get the benefits of this architecture.
One can take advantage of the shared memory in a thread block to write faster code. Here, we wrote the 2D integration example from the previous section where threads in a block write on a shared[] array. Then, this array is reduced (values added) and the output is collected in the array C. The entire code is here:
integration2d_gpu_shared.py
from __future__ import division
from numba import cuda, float32
import numpy
import math
from time import perf_counter

# grid size
n = 100*1024
threadsPerBlock = 16
blocksPerGrid = int((n+threadsPerBlock-1)/threadsPerBlock)

# interval size (same for X and Y)
h = math.pi / float(n)

@cuda.jit
def dotprod(C):
    # using the shared memory in the thread block
    shared = cuda.shared.array(shape=(threadsPerBlock), dtype=float32)

    tid = cuda.threadIdx.x + cuda.blockIdx.x * cuda.blockDim.x
    shrIndx = cuda.threadIdx.x

    if tid >= n:
        return

    #cummulative variable
    mysum = 0.0
    # fine-grain integration in the X axis
    x = h * (tid + 0.5)
    # regular integration in the Y axis
    for j in range(n):
        y = h * (j + 0.5)
        mysum += math.sin(x + y)

    shared[shrIndx] = mysum

    cuda.syncthreads()

    # reduction for the whole thread block
    s = 1
    while s < cuda.blockDim.x:
        if shrIndx % (2*s) == 0:
            shared[shrIndx] += shared[shrIndx + s]
        s *= 2
        cuda.syncthreads()
    # collecting the reduced value in the C array
    if shrIndx == 0:
        C[cuda.blockIdx.x] = shared[0]

# array for collecting partial sums on the device
C_global_mem = cuda.device_array((blocksPerGrid),dtype=numpy.float32)

starttime = perf_counter()
dotprod[blocksPerGrid,threadsPerBlock](C_global_mem)
res = C_global_mem.copy_to_host()
integral = h**2 * sum(res)
endtime = perf_counter()

print("Integral value is %e, Error is %e" % (integral, abs(integral - 0.0)))
print("Time spent: %.2f sec" % (endtime-starttime))
Prepare a batch script to run these two versions of the integration 2D with Numba support and monitor the timings for both cases.
Solution for HPC2N
A template for running the python codes at HPC2N is here:
job-gpu.sh#!/bin/bash # Remember to change this to your own project ID after the course! #SBATCH -A hpc2n2026-002 #SBATCH -t 00:08:00 #SBATCH -N 1 #SBATCH -n 24 #SBATCH -o output_%j.out # output file #SBATCH -e error_%j.err # error messages #SBATCH --gpus=1 #SBATCH -C l40s #SBATCH --exclusive ml purge > /dev/null 2>&1 ml GCC/12.3.0 Python/3.11.3 OpenMPI/4.1.5 SciPy-bundle/2023.07 CUDA/12.1.1 numba/0.58.1 python integration2d_gpu.py python integration2d_gpu_shared.pyFor the
integration2d_gpu.pyimplementation, the time for executing the kernel and doing some postprocessing to the outputs (copying the C array and doing a reduction) was 4.35 sec. which is a much smaller value than the time for the serial numba code of 152 sec obtained previously.The simulation time for the
integration2d_shared.pyimplementation was 1.87 sec. by using the shared memory trick.
Solution for UPPMAX
A template for running the python codes at UPPMAX is here:
job-gpu.sh#!/bin/bash # Remember to change this to your own project ID after the course! #SBATCH -A uppmax2025-2-393 # We are asking for 10 minutes #SBATCH --time=00:10:00 # Asking for one GPU #SBATCH -p gpu #SBATCH --gpus=l40s:1 #SBATCH -o output_%j.out # output file #SBATCH -e error_%j.err # error messages # Remove any loaded modules and load the ones we need ml purge > /dev/null 2>&1 module load Python/3.13.5 foss/2025b CUDA/13.0.2 source /sw/arch/local/software/python/venvs/numba-gpu/bin/activate # Run your Python script python integration2d_gpu.py python integration2d_gpu_shared.py
Solution for LUNARC
A template for running the python codes at LUNARC is here:
job-gpu.sh#!/bin/bash # Remember to change this to your own project ID after the course! #SBATCH -A lu2026-7-57 #SBATCH -t 00:15:00 #SBATCH -n 24 #SBATCH -o output_%j.out # output file #SBATCH -e error_%j.err # error messages #SBATCH --ntasks-per-node=1 #SBATCH -p gpua100 #SBATCH --gres=gpu:1 #SBATCH --exclusive ml purge > /dev/null 2>&1 module load GCC/12.2.0 OpenMPI/4.1.4 Python/3.10.8 SciPy-bundle/2023.02 CUDA/12.1.1 numba/0.58.0 python integration2d_gpu.py python integration2d_gpu_shared.py
Solution for NSC
A template for running the python codes at NSC is here:
job-gpu.sh#!/bin/bash # Remember to change this to your own project ID after the course! #SBATCH -A naiss2026-4-66 #SBATCH -t 00:20:00 #SBATCH -n 24 #SBATCH --gpus-per-task=1 #SBATCH -o output_%j.out # output file #SBATCH -e error_%j.err # error messages #SBATCH --exclusive ml purge > /dev/null 2>&1 ml Python/3.11.5-bare-hpc1-gcc-2023b-eb ml buildenv-gcccuda/12.9.1-gcc11-hpc1 # If you are running this during the course, you can use the venv we have created for you source /proj/courses-fall-2025/numba-gpu/bin/activate # Otherwise, you have to create a virtual environment to use, then comment out the above # Create a virtual environment to use. Do this before submitting the job # cd /proj/courses-fall-2025/users/<mydir> # module load Python/3.11.5-bare-hpc1-gcc-2023b-eb # module load buildenv-gcccuda/12.9.1-gcc11-hpc1 # python3 -m venv numba-gpu # source numba-gpu/bin/activate # pip3 install --upgrade pip setuptools wheel # pip3 install numba-cuda\[cu13\] numpy # Then in the batch script, you load it # source /proj/courses-fall-2025/users/<mydir>/numba-gpu/bin/activate # Remove the comment of the above line if you created your own venv python integration2d_gpu.py python integration2d_gpu_shared.py
Solution for C3SE
A template for running the python codes at C3SE is here:
job-gpu.sh#!/bin/bash # Remember to change this to your own project ID! #SBATCH -A naiss2026-4-66 #SBATCH -t 00:15:00 #SBATCH -p alvis #SBATCH -N 1 --gpus-per-node=T4:4 #SBATCH -o output_%j.out # output file #SBATCH -e error_%j.err # error messages ml purge > /dev/null 2>&1 ml numba-cuda/0.20.0-foss-2025b-CUDA-12.9.1 python integration2d_gpu.py python integration2d_gpu_shared.py
Keypoints
You deploy GPU nodes via SLURM, either in interactive mode or batch
In Python the numba package is handy
Important
Of course, interactive mode could also be from inside Desktop on Demand, Jupyter, VScode, spyder …
CUDA does not work directly on AMD GPUs, there hip is used instead.
We will use GPUs more in the ML/DL section!
Additional information
Hands-On GPU Programming with Python and CUDA : Explore High-Performance Parallel Computing with CUDA, Brian Tuomanen. Packt publishing.
Parallel and High Performance Computing, Robert Robey and Yuliana Zamora. Manning publishing.