The iterations and Git
Questions
Why should you use source/version control?
Have you used Git (locally) in your own work?
Answer in Menti
Objectives
We will
work with the basic commands in git
go through branching and merging
Note
We will cover the most basic things with Git such that you can use it this week.
For deeper understanding and hands-on on branching etcetera, please confer the course material of NBIS and CodeRefinery.
Start with pushing your changes in the local Git to GitHub
$ git push
You should now see something like:
Enumerating objects: 7, done.
Counting objects: 100% (7/7), done.
Delta compression using up to 8 threads
Compressing objects: 100% (7/7), done.
Writing objects: 100% (7/7), 846 bytes | 846.00 KiB/s, done.
Total 7 (delta 1), reused 0 (delta 0), pack-reused 0
remote: Resolving deltas: 100% (1/1), done.
To github.com:bclaremar/Formalisms.git
 * [new branch]      main -> main
branch 'main' set up to track 'origin/main'.
If you get errors
If you instead get something like the below, your SSH keys are not correctly configured.
git@github.com: Permission denied (publickey).
fatal: Could not read from remote repository.

Please make sure you have the correct access rights
and the repository exists.
If ssh -T git@github.com gives an error, this is the case.
Approximate steps
ssh-keygen -t ed25519 -C "email address"
eval "$(ssh-agent -s)"
ssh-add ~/.ssh/id_ed25519
Hope you can fix this in Lunch Break. Follow the rest by listening for now.
Reload your GitHub project website and - taa-daa - your commits should now be online!
What just happened? Think of publishing a repository as uploading the .git part online.
Alternative way to initialize Git
A new repository from an existing project on own computer or HPC user account.
Say you’ve got an existing project that you want to start tracking with git.
Go into the directory containing the project.
Type
git init.Type
git addto add all of the relevant files.You’ll probably want to create a
.gitignorefile right away, to indicate all of the files you don’t want to track. Usegit add .gitignore, too.Type
git commit.
Make the next iteration of the planet project
Type-along: Add Jupiter
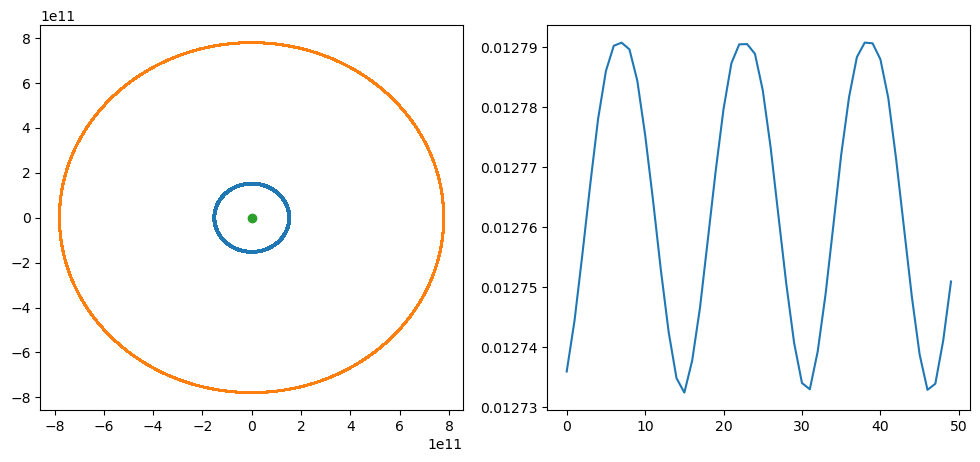
We will add some lines to count with the effects from the gravity of Jupiter on Earth
Code
#planet with Jupiter
import numpy as np
import matplotlib.pyplot as plt

#constants
G=6.6743e-11
AU=149.597871e9 # 1 astronomical unit (AU) is the mean distance between sun and Earth
AU1=150.8e9
dJ=5.203*AU
mj=5.97219e24
mJ=1.899e27
M=1.9891e30
day=86400;
year=31556926;
v0=AU*2*np.pi/year;

#Jupiter
v0J=dJ*2*np.pi/(11.86*year);

L=50000

x0=AU1;
y0=0;
u0=0;
x=np.zeros(365*L, dtype=float);
y=np.zeros(365*L, dtype=float);


x[0]=x0;
y[0]=y0;
u=u0;
v=v0;

x0J=dJ;
y0J=0;
u0J=0;
xJ=np.zeros(365*L, dtype=float);
yJ=np.zeros(365*L, dtype=float);
xJ[0]=x0J;
yJ[0]=y0J;
uJ=u0J;
vJ=v0J;

for i in range(1,365*L):
    if i % 36500==0:
        print(i/365)

    x[i]=x[i-1]+day*u;
    y[i]=y[i-1]+day*v;
    xJ[i]=xJ[i-1]+day*uJ;
    yJ[i]=yJ[i-1]+day*vJ;

    axS=-G*M/(abs(x[i]**2+y[i]**2)**[3/2])*x[i];
    ayS=-G*M/(abs(x[i]**2+y[i]**2)**[3/2])*y[i];
    dxJ=x[i]-xJ[i];
    dyJ=y[i]-yJ[i];
    axEJ=-G*mJ/(abs(dxJ**2+dyJ**2)**[3/2])*dxJ;
    ayEJ=-G*mJ/(abs(dxJ**2+dyJ**2)**[3/2])*dyJ;
    ax=axS+axEJ;
    ay=ayS+ayEJ;

    u=u+ax*day;
    v=v+ay*day;

    axJ=-G*M/(abs(xJ[i]**2+yJ[i]**2)**[3/2])*xJ[i];
    ayJ=-G*M/(abs(xJ[i]**2+yJ[i]**2)**[3/2])*yJ[i];
    uJ=uJ+axJ*day;
    vJ=vJ+ayJ*day;


rj=(x**2+y**2)**.5

l=1000;
e=np.zeros(int(L/l), dtype=float);
for i in range(0,int(L/l)):
    win=range(i*l*365,(i+1)*l*365)
    print((win))
    a=max(rj[win])
    b=min(rj[win])
    print(a,b)
    e[i]=1-2/(a/b+1)

fig=plt.figure(1,figsize=(12,5))
ax=fig.add_subplot(1,2,1)
ax.plot(x,y)
ax.plot(xJ,yJ)
ax.plot (0,0,'o')


ax=fig.add_subplot(1,2,2)
ax.plot(range(0,int(L/l)),e)

plt.savefig('../Figures/planet_earthJupiter.png', dpi=100, bbox_inches='tight')
Do not run because we changed from 2 years simulation time to 5000 years!
The output should look like this at least.
Do not stage (add) yet!
Discussion
That’s long code!
Perhaps make modular?
The orbits seems too elliptic in the plot. The axes should be equal!
Let’s look at that in the next iteration!
git diff
Type-Along
When you are done editing the files, try
git diff:
$ git diff
You can use arrows or enter to scroll the output and quit with
q.You will see some thing like this.
Output from diff
diff --git a/planet.py b/planet.py
index 60b8b20..8061461 100644
--- a/planet.py
+++ b/planet.py
@@ -1,23 +1,24 @@
-#planet
+
+#planet with Jupiter
 import numpy as np
 import matplotlib.pyplot as plt

 #constants
 G=6.6743e-11
 AU=149.597871e9 # 1 astronomical unit (AU) is the mean distance between sun and Earth
 AU1=150.8e9
+dJ=5.203*AU
 mj=5.97219e24
 mJ=1.899e27
 M=1.9891e30
 day=86400;
 year=31556926;
 v0=AU*2*np.pi/year;
-Fg=G*M*mj/AU**2
-ag=Fg/mj
-Fc=mj*v0**2/AU
-ac=Fc/mj

-L=2
+#Jupiter
+v0J=dJ*2*np.pi/(11.86*year);
+
+L=50000

 x0=AU1;
 y0=0;
@@ -25,34 +26,69 @@ u0=0;
 x=np.zeros(365*L, dtype=float);
 y=np.zeros(365*L, dtype=float);

+
 x[0]=x0;
 y[0]=y0;
 u=u0;
 v=v0;

+x0J=dJ;
+y0J=0;
+u0J=0;
+xJ=np.zeros(365*L, dtype=float);
+yJ=np.zeros(365*L, dtype=float);
+xJ[0]=x0J;
+yJ[0]=y0J;
+uJ=u0J;
+vJ=v0J;
+
 for i in range(1,365*L):
-    print(i)
+    if i % 36500==0:
+        print(i/365)
+
     x[i]=x[i-1]+day*u;
     y[i]=y[i-1]+day*v;
-    ax=-G*M/(abs(x[i]**2+y[i]**2)**[3/2])*x[i];
-    ay=-G*M/(abs(x[i]**2+y[i]**2)**[3/2])*y[i];
+    xJ[i]=xJ[i-1]+day*uJ;
+    yJ[i]=yJ[i-1]+day*vJ;
+
+    axS=-G*M/(abs(x[i]**2+y[i]**2)**[3/2])*x[i];
+    ayS=-G*M/(abs(x[i]**2+y[i]**2)**[3/2])*y[i];
+    dxJ=x[i]-xJ[i];
+    dyJ=y[i]-yJ[i];
+    axEJ=-G*mJ/(abs(dxJ**2+dyJ**2)**[3/2])*dxJ;
+    ayEJ=-G*mJ/(abs(dxJ**2+dyJ**2)**[3/2])*dyJ;
+    ax=axS+axEJ;
+    ay=ayS+ayEJ;
+
     u=u+ax*day;
     v=v+ay*day;

+    axJ=-G*M/(abs(xJ[i]**2+yJ[i]**2)**[3/2])*xJ[i];
+    ayJ=-G*M/(abs(xJ[i]**2+yJ[i]**2)**[3/2])*yJ[i];
+    uJ=uJ+axJ*day;
+    vJ=vJ+ayJ*day;
+
+
 rj=(x**2+y**2)**.5
-a=max(rj)
-b=min(rj)
-e=1-2/(a/b+1)
-rel=(a/b-1)

+l=1000;
+e=np.zeros(int(L/l), dtype=float);
+for i in range(0,int(L/l)):
+    win=range(i*l*365,(i+1)*l*365)
+    print((win))
+    a=max(rj[win])
+    b=min(rj[win])
+    print(a,b)
+    e[i]=1-2/(a/b+1)

 fig=plt.figure(1,figsize=(12,5))
 ax=fig.add_subplot(1,2,1)
 ax.plot(x,y)
+ax.plot(xJ,yJ)
 ax.plot (0,0,'o')
-#axis equal
+

 ax=fig.add_subplot(1,2,2)
-ax.plot(range(0,365*2),rj)
+ax.plot(range(0,int(L/l)),e)

-plt.savefig('../Figures/planet_earth.png', dpi=100, bbox_inches='tight')
+plt.savefig('../Figures/planet_earthJupiter.png', dpi=100, bbox_inches='tight')
(END)
Stage and commit the changes
Type-Along
Now first stage and then commit (what happens when we leave out the
-mflag?):
  $ git add python.py     # <-- we can state exactly which file to stage as well
  $ git commit                   # <-- we have left out -m "..."
When you leave out the -m flag, Git should open an editor where you can edit
your commit message. This message will be associated and stored with the
changes you made. This message is your chance to explain what you’ve done and
convince others (and your future self) that the changes you made were
justified. Write a message (like added Jupiter and save and close the file.
When you are done committing the changes, experiment with these commands:
$ git log
$ git log --stat
$ git log --oneline
Ignoring files and paths with .gitignore
Compiled and generated files are not committed to version control. There are many reasons for this:
Your code could be run on different platforms.
These files are automatically generated and thus do not contribute in any meaningful way.
The number of changes to track per source code change can increase quickly.
When tracking generated files you could see differences in the code although you haven’t touched the code.
For this we use .gitignore files. Read more https://uppmax.github.io/programming_formalisms_intro/git_deeper.html
Not important for our project right now.
But, we should had omitted the virtual environment, i.e. the directory
planet-project.
Branching and merging
Software development is often not linear:
We typically need at least one version of the code to “work” (to compile, to give expected results, …).
At the same time we work on new features, often several features concurrently. Often they are unfinished.
We need to be able to separate different lines of work really well.

Isolated tracks of work.
The strength of version control is that it permits the researcher to isolate different tracks of work, which can later be merged to create a composite version that contains all changes.
We see branching points and merging points.
Main line development is often called
masterormain.Other than this convention there is nothing special about
masterormain, it is just a branch.Commits form a directed acyclic graph (we have left out the arrows to avoid confusion about the time arrow).
A group of commits that create a single narrative are called a branch. There are different branching strategies, but it is useful to think that a branch tells the story of a feature, e.g. “fast sequence extraction” or “Python interface” or “fixing bug in matrix inversion algorithm”.
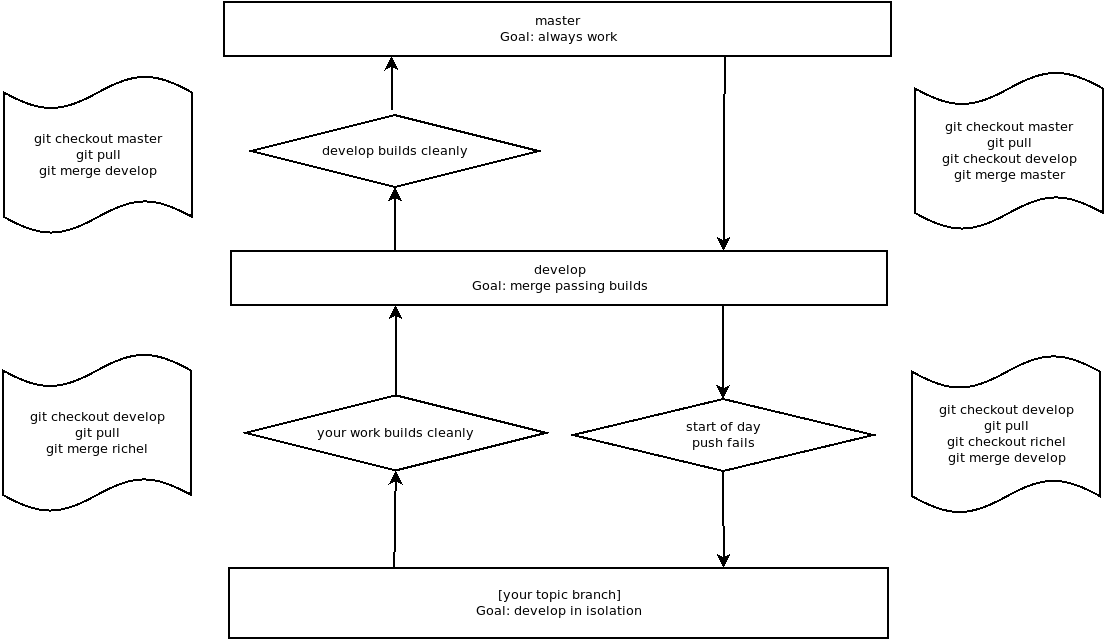
Typical workflows
One typical workflow:
$ git checkout -b new-feature  # create branch, switch to it
$ git commit                   # work, work, work, ..., and test
$ git checkout master          # once feature is ready, switch to master
$ git merge new-feature        # merge work to master
$ git branch -d new-feature    # remove branch
Note
Let’s make our code modular (test in branch)
Make four modules (10-15 minutes in BO)
First make a branch called
modularityand go to that branch
$ git checkout -b modularity    # create branch, switch to it
$ git branch                    # check that we are on the new branch
We can now do our changes
We will make four files
planet_main.py, containing an overview e.g. the main programplanet_data.py, containing general constants, and planetary parametersplanet_iter.py, containing the equation of motion for the planetsplanet_functions.py, containing eccentricity calculations and a plot function
planet_main.py
#planet with Jupiter
import numpy as np
from  planet_functions import *
from  planet_data import *
from  planet_iter import *

L=400 #number of years to simulate

G,AU,M,day,year=general_constants()

# Get the mass and the initial position of Earth
x,y,u,v,mj=init_Earth(AU,year,L)

# Get the mass and the initial position of Jupiter
xJ,yJ,uJ,vJ,mJ=init_Jupiter(AU,year,L)

for i in range(1,365*L):
    #Counter for each 100 years
    if i % 36500==0:
        print(i/365)

    # New positions of Earth
    x[i]=x[i-1]+day*u;
    y[i]=y[i-1]+day*v;

    # New positions of Jupiter
    xJ[i]=xJ[i-1]+day*uJ;
    yJ[i]=yJ[i-1]+day*vJ;

    # acceleration of Earth due to Sun
    axS, ayS = acc_effect(G,M,x[i],y[i])

    # acceleration of Earth due to Jupiter
    dxJ=x[i]-xJ[i];
    dyJ=y[i]-yJ[i];
    axEJ, ayEJ = acc_effect(G,mJ,dxJ,dyJ)

    # net effect on velocity of Earth
    ax=axS+axEJ;
    ay=ayS+ayEJ;
    u=u+ax*day;
    v=v+ay*day;

    # new velocity of Jupiter
    uJ,vJ = planet_motion(G,M,xJ[i],yJ[i],uJ,vJ,day)


l=100
e=eccentricity(x,y,L,l)

figure_orbit(x,y,xJ,yJ,e)
planet_data.py
import numpy as np

def general_constants():
#  global G, M, AU, day, year
  G=6.6743e-11
  AU=149.597871e9
  M=1.9891e30
  day=86400;
  year=31556926;

  return G,AU,M,day,year

def init_Earth(AU,year,L):

  mj=5.97219e24
  AU1=150.8e9

  x0=AU1;
  v0=AU*2*np.pi/year;
  y0=0;
  u0=0;
  x=np.zeros(365*L, dtype=float);
  y=np.zeros(365*L, dtype=float);
  x[0]=x0;
  y[0]=y0;
  u=u0;
  v=v0;

  return x,y,u,v,mj

def init_Jupiter(AU,year,L):
  dJ=5.203*AU
  mJ=1.899e27
  v0J=dJ*2*np.pi/(11.86*year);

  x0J=dJ;
  y0J=0;
  u0J=0;
  xJ=np.zeros(365*L, dtype=float);
  yJ=np.zeros(365*L, dtype=float);
  xJ[0]=x0J;
  yJ[0]=y0J;
  uJ=u0J;
  vJ=v0J;

  return xJ,yJ,uJ,vJ,mJ
planet_iter.py
import numpy as np

def acc_effect(G,M,x,y):

    ax=-G*M/(abs(x**2+y**2)**[3/2])*x;
    ay=-G*M/(abs(x**2+y**2)**[3/2])*y;

    return ax, ay

def planet_motion(G,M,x,y,u,v,day):

    ax=-G*M/(abs(x**2+y**2)**[3/2])*x;
    ay=-G*M/(abs(x**2+y**2)**[3/2])*y;
    u=u+ax*day;
    v=v+ay*day;

    return u, v
planet_functions.py
import numpy as np
import matplotlib.pyplot as plt

def eccentricity(x,y,L,l):

  rj=(x**2+y**2)**.5
  e=np.zeros(int(L/l), dtype=float);
  for i in range(0,int(L/l)):
    win=range(i*l*365,(i+1)*l*365)
    a=max(rj[win])
    b=min(rj[win])
    e[i]=1-2/(a/b+1)
  return e

def figure_orbit(x,y,xJ,yJ,e):

  fig=plt.figure(1,figsize=(12,5))
  ax=fig.add_subplot(1,2,1)
  ax.plot(x,y)
  ax.plot(xJ,yJ)
  ax.plot (0,0,'o')
  ax.set_aspect('equal', 'box')

  ax=fig.add_subplot(1,2,2)
  ax.plot(range(0,len(e)),e)

  figname='../Figures/planet_earthJupiter2.png'

  plt.savefig(figname, dpi=100, bbox_inches='tight')
add and commit, possibly several times
Meanwhile…
Type-Along
Back in main branch
We spotted some unnecessary
printlines in the main branch code.Go to the main branch:
git checkout main
Let’s remove the two print lines around row 80 in the second for-loop.
add and commit
git add planet.py
git commit -m "rm print"
We can now check the history with a command that graphically tries to show the log with branches
Tip
An important alias
We will now define an alias in Git, to be able to nicely visualize branch structure in the terminal without having to remember a long Git command.
$ git config --global alias.graph "log --all --graph --decorate --oneline"
This will enable you to use git graph for short
It will give you something like this:
$ git graph
* 413d0e3 (HEAD -> master) rm printing output
| * fc007d4 (modular) modular code
|/
* 5434395 add Jupiter
* f3c1fb5 planet.py
...
Merging
It turned out that our experiment with modularity was a good idea.
Our goal now is to merge modularity into main.
Isolated tracks of work.
Merge into main
once all features are ready, switch to main
$ git checkout main    # switch to main branch
$ git branch           # check that we are on main branch
$ git merge  modularity          # merge modularity into main
let’s now check the graphical view:
$ git graph
*   dc3f83f (HEAD -> main) modular
|\
| * fc007d4 (modularity) modular code
* | 413d0e3 rm printing output
|/
* 5434395 add Jupiter
* f3c1fb5 planet.py
push to GitHub
git push
Summary
Now we know how to save snapshots:
$ git add <file(s)>
$ git commit
And that is what we do as we program.
Other very useful commands are these:
$ git init    # initialize new repository
$ git add     # add files or stage file(s)
$ git commit  # commit staged file(s)
$ git status  # see what is going on
$ git log     # see history
$ git diff    # show unstaged/uncommitted modifications
$ git show    # show the change for a specific commit
$ git mv      # move tracked files
$ git rm      # remove tracked files
$ git checkout -b wild-idea    # create branch, switch to it, work, work, work ...
$ git checkout main          # realize it was a bad idea, back to main/master
$ git branch -D wild-idea      # it is gone, off to a new idea
$ git merge
Overview workflow
Parts to be covered
☑ Planning
Pseudocode
Unified Modelling Language
☐ Testing
We don’t do this today!
☑ Source/version control
We have a starting point with code
git history
git branches
GitHub as remote backup
☐ Collaboration
GitHub
☑ Sharing
☑ open science
☐ citation
☑ licensing
☐ Documentation
docstrings should actually be implemented directly!!
we save that now for next sesson
Keypoints
Initializing a Git repository is simple:
git init.Commits should be used to tell a story.
Git uses the .git folder to store the snapshots.
Don’t be afraid to stage and commit often. Better too often than not often enough.
A branch is a division unit of work, to be merged with other units of work.
A tag is a pointer to a moment in the history of a project.
A repository can have one or multiple remotes (we will revisit these later).
Local branches often track remote branches.
A remote serves as a full backup of your work.