More about git
This material is based on or inspired by the material from [NBIS](https://nbis-reproducible-research.readthedocs.io/en/course_2104/git/) and [CodeRefinery](https://coderefinery.github.io/git-intro/)

```{note}
- We will cover the most basic things with Git such that you can use it this week.
- For deeper understanding and hands-on on branching etcetera, please confer the course material of [NBIS](https://nbis-reproducible-research.readthedocs.io/en/course_2104/git/) and [CodeRefinery](https://coderefinery.github.io/git-intro/).
Git
We will start with our own repository.
branching and merging (locally)
and a brief introduction to pushing to remotes.
In the separate collaborative Git lesson, we teach more use of remote repositories and good collaborative workflows.
Prerequisites
Git and GITHUB should be configured prior to the course following https://coderefinery.github.io/installation).
Being comfortable with the command line. No expertise is required, but the lesson will be mostly taken from the command line.
Students should be familiar with using a text editor on their system. Emacs and Vim are excellent choices if you know how to use them but Nano or Notepad on Windows are sufficient.
What is Git, and what is a Git repository?
Git is a version control system: can record/save snapshots and track the content of a folder as it changes over time.
Every time we commit a snapshot, Git records a snapshot of the entire project, saves it, and assigns it a version.
These snapshots are kept inside a sub-folder called
.git.If we remove
.git, we remove the repository and history (but keep the working directory!)..gituses relative paths - you can move the whole thing somewhere else and it will still workGit doesn’t do anything unless you ask it to (it does not record anything automatically).
Multiple interfaces to Git exist (command line, graphical interfaces, web interfaces).
Recording a snapshot with Git
Git takes snapshots only if we request it.
We will record changes always in two steps (we will later explain why this is a recommended practice).
Example (we don’t need to type yet):
$ git add somefile.txt
$ git commit

$ git add file.txt anotherfile.txt
$ git commit
We first focus (
git add, we “stage” the change), then shoot (git commit):
Before we start we need to configure Git
Attention
Start your terminal of choice
MAC terminal
iTerm
WSL environment in
MobaxTerm
Visual Studio Code
Git BASH
PowerShell
If you haven’t already configured Git, please follow the instructions in the installation instructions.
$ git config --global user.name "Your Name"
$ git config --global user.email yourname@example.com
$ git config --global core.editor nano
Verify with:
$ git config --list
Type-along
Create repository
We will create a repository (repo) called Diagrams.
Be sure you are in a directory like “Programming_Formalisms” or similar (to have track of your work)
One of the basic principles of Git is that it is easy to create repositories:
$ mkdir Diagrams
$ cd Diagrams
$ git init
That’s it! With git init have now created an empty Git repository.
Check status
We will use git status a lot to check out what is going on:
$ git status

On branch master

No commits yet

nothing to commit (create/copy files and use "git add" to track)
We will make sense of this information during this workshop.
A new repository from an existing project on own computer or HPC user account.
Say you’ve got an existing project that you want to start tracking with git.
Go into the directory containing the project.
Type
git init.Type
git addto add all of the relevant files.You’ll probably want to create a
.gitignorefile right away, to indicate all of the files you don’t want to track. Usegit add .gitignore, too.Type
git commit.
Git everyday steps
Let us now create two files.
One file is called class.puml and contains:
@startuml
 class01 <|-- class02
 class03 *-- class04
 class05 o-- class06

 class01- class03 : knows >
 class class01 {
    -var01 : Integer
    Time : Date
    #method01()
    +get_var01()
    {method}Without parentheses or Qualifiers
 }
@enduml
The second file is called activity.puml and contains:
@startuml
start

if (Graphviz installed?) then (yes)
  :process all\ndiagrams;
else (no)
  :process only
  __sequence__ and __activity__ diagrams;
endif

stop
@enduml
Staging files
As mentioned above, in Git you can always check the status of files in your repository using
git status. It is always a safe command to run and in general a good idea to
do when you are trying to figure out what to do next:
On branch master

No commits yet

Untracked files:
  (use "git add <file>..." to include in what will be committed)
        activity.puml
        class.puml

nothing added to commit but untracked files present (use "git add" to track)
The two files are untracked in the repository (directory). You want to add the files (focus the camera) to the list of files tracked by Git. Git does not track any files automatically and you need make a conscious decision to add a file. Let’s do what Git hints at and add the files:
$ git add .    # < -- "." means all files
$ git status

On branch master

Initial commit

Changes to be committed:
  (use "git rm --cached <file>..." to unstage)

        new file:   activity.puml
        new file:   class.puml
Now this change is staged and ready to be committed.
Commit
Let us now commit the change to the repository:
$ git commit -m "adding class and activity diagrams"

[master (root-commit) 8adee34] adding class and activity diagrams
 2 files changed, 26 insertions(+)
 create mode 100644 activity.puml
 create mode 100644 class.puml
Right after we query the status to get this useful command into our muscle memory:
$ git status

On branch master
nothing to commit, working tree clean
What does the -m flag mean? Let us check the help page for that command:
$ git help commit
You should see a very long help page as the tool is very versatile (press q to quit). Do not worry about this now but keep in mind that you can always read the help files when in doubt. Searching online can also be useful, but choosing search terms to find relevant information takes some practice and discussions in some online threads may be confusing. Note that help pages also work when you don’t have a network connection!
Exercise-optional
Make changes (10 min)
Add the follwing lines before the line “@enduml” to class.puml:
class class02 {
   -var02 : Float
   Time : Date
   #method01()
   +get_var02()
   {method}Without parentheses or Qualifiers
}

 When you are done editing the files, try `git diff`:

 ```console
 $ git diff
You will see (can you identify in there the two added lines?):
diff --git a/class.puml b/class.puml
index 3b3fd07..2be3224 100644
--- a/class.puml
+++ b/class.puml
@@ -11,4 +11,12 @@
     +get_var01()
     {method}Without parentheses or Qualifiers
  }
+
+ class class02 {
+    -var02 : Float
+    Time : Date
+    #method01()
+    +get_var02()
+    {method}Without parentheses or Qualifiers
+ }
 @enduml

Now first stage and then commit (what happens when we leave out the `-m` flag?):

```console
  $ git add class.puml     # <-- we can state exactly which file to stage as well
  $ git commit                   # <-- we have left out -m "..."
When you leave out the -m flag, Git should open an editor where you can edit
your commit message. This message will be associated and stored with the
changes you made. This message is your chance to explain what you’ve done and
convince others (and your future self) that the changes you made were
justified. Write a message and save and close the file.
When you are done committing the changes, experiment with these commands:
$ git log
$ git log --stat
$ git log --oneline
Git history and log
If you haven’t yet, please try now git log:
$ git log

commit 4bb8b6fa66e5ea693a80e40cee3c3014163eb7ac (HEAD -> master)
Author: bclaremar <bjorn.claremar@uppmax.uu.se>
Date:   Sat Oct 22 19:27:57 2022 +0200

    Added info for class02

commit 8adee34b35a8b1b1c1c41f4dce1b1e793030f669
Author: bclaremar <bjorn.claremar@uppmax.uu.se>
Date:   Fri Oct 21 23:37:31 2022 +0200

    adding class and activity diagrams
We can browse the development and access each state that we have committed.
The long hashes uniquely label a state of the code.
They are not just integers counting 1, 2, 3, 4, … (why?).
Output is in reverse chronological order, i.e. newest commits on top.
We will use them when comparing versions and when going back in time.
git log --onelineonly shows the first 7 characters of the commit hash and is good to get an overview.If the first characters of the hash are unique it is not necessary to type the entire hash.
git log --statis nice to show which files have been modified.
Writing useful commit messages
Using git log --oneline we understand that the first line of the commit message is very important.
Good example:
increase threshold alpha to 2.0

the motivation for this change is
to enable ...
...
this is based on a discussion in #123
Convention: one line summarizing the commit, then one empty line, then paragraph(s) with more details in free form, if necessary.
Why something was changed is more important than what has changed.
Cross-reference to issues and discussions if possible/relevant.
Bad commit messages: “fix”, “oops”, “save work”
Bad examples: http://whatthecommit.com
Write commit messages in English that will be understood 15 years from now by someone else than you. Or by your future you.
Many projects start out as projects “just for me” and end up to be successful projects that are developed by 50 people over decades.
Commits with multiple authors are possible.
Good references:
Note
A great way to learn how to write commit messages and to get inspired by their style choices: browse repositories of codes that you use/like:
Some examples (but there are so many good examples):
ggplot2, compare with their release notes
Flask, compare with their release notes
When designing commit message styles consider also these:
How will you easily generate a changelog or release notes?
During code review, you can help each other improving commit messages.
But remember: it is better to make any commit, than no commit. Especially in small projects. Let not the perfect be the enemy of the good enough.
Ignoring files and paths with .gitignore
Discussion
Should we add and track all files in a project?
How about generated files?
Why is it considered a bad idea to commit compiled binaries to version control?
What types of generated files do you know?
Compiled and generated files are not committed to version control. There are many reasons for this:
Your code could be run on different platforms.
These files are automatically generated and thus do not contribute in any meaningful way.
The number of changes to track per source code change can increase quickly.
When tracking generated files you could see differences in the code although you haven’t touched the code.
For this we use .gitignore files. Example:
# ignore compiled python 2 files
*.pyc
# ignore compiled python 3 files
__pycache__
An example taken from the official Git documentation:
# ignore objects and archives, anywhere in the tree.
*.[oa]
# ignore generated html files,
*.html
# except foo.html which is maintained by hand
!foo.html
# ignore everything under build directory
build/
.gitignoreshould be part of the repository because we want to make sure that all developers see the same behavior.All files should be either tracked or ignored.
.gitignoreuses something called a shell glob syntax for determining file patterns to ignore. You can read more about the syntax in the documentation.You can have
.gitignorefiles in lower level directories and they affect the paths relatively.
Graphical user interfaces
We have seen how to make commits directly via the GitHub website, and also via command line. But it is also possible to work from within a Git graphical user interface (GUI):
Branching and merging
A branch is a division unit of work, to be merged with other units of work.
A tag is a pointer to a moment in the history of a project.

Isolated tracks of work.
Typical workflows
There are two typical workflows:
$ git checkout -b new-feature  # create branch, switch to it
$ git commit                   # work, work, work, ..., and test
$ git checkout master          # once feature is ready, switch to master
$ git merge new-feature        # merge work to master
$ git branch -d new-feature    # remove branch
Sometimes you have a wild idea which does not work. Or you want some throw-away branch for debugging:
$ git checkout -b wild-idea    # create branch, switch to it, work, work, work ...
$ git checkout master          # realize it was a bad idea, back to master
$ git branch -D wild-idea      # it is gone, off to a new idea
No problem: we worked on a branch, branch is deleted, master is clean.
Note
Working remotely and sharing (github)
Discussion
What if the hard disk fails?
What if somebody steals my laptop?
How can we collaborate with others across the web?
You might use remotes to:
Back up your own work.
To collaborate with other people.
There are different types of remotes:
If you have a server you can ssh to, you can use that as a remote.
GitHub is a popular, closed-source commercial site.
GitLab is a popular, open-core commercial site. Many universities have their own private GitLab servers set up.
Bitbucket is yet another popular commercial site.
Another option is NotABug
We also operate a Nordic research software repository platform. This is GitLab, free for researchers and allows private, cross-university sharing.
Type-along: Create a new repository on GitHub
For the rest of this page, we will make a new repository for our guacamole recipe on GitHub (here we motivate why we demonstrate this with GitHub), send our code to it, and then see how others can get the code from it.
Make sure that you are logged into GitHub.
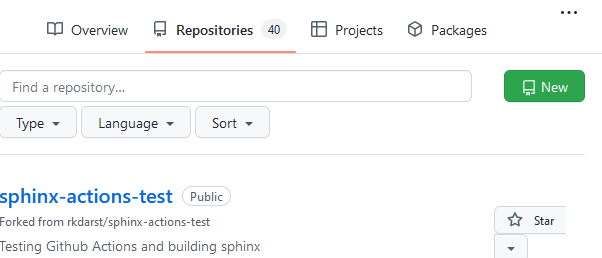
To create a repository we either click the green button “New” (top left corner).
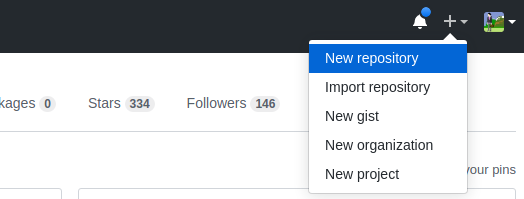
Or if you see your profile page, there is a “+” menu (top right corner).
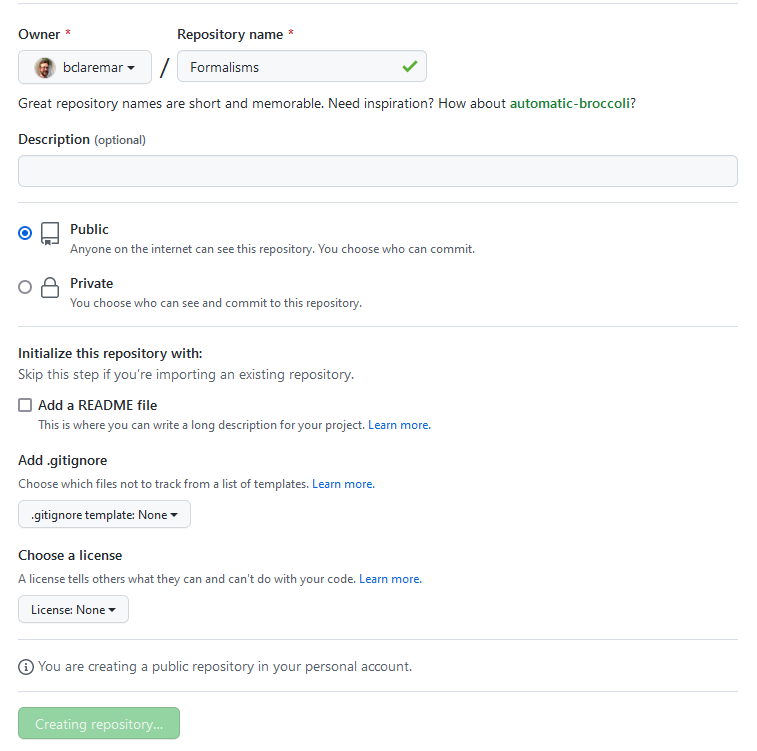
On this page choose a project name. For the sake of this exercise do not select “Initialize this repository with a README” (what will happen if you do?):
Once you click the green “Create repository”, you will see a page similar to:
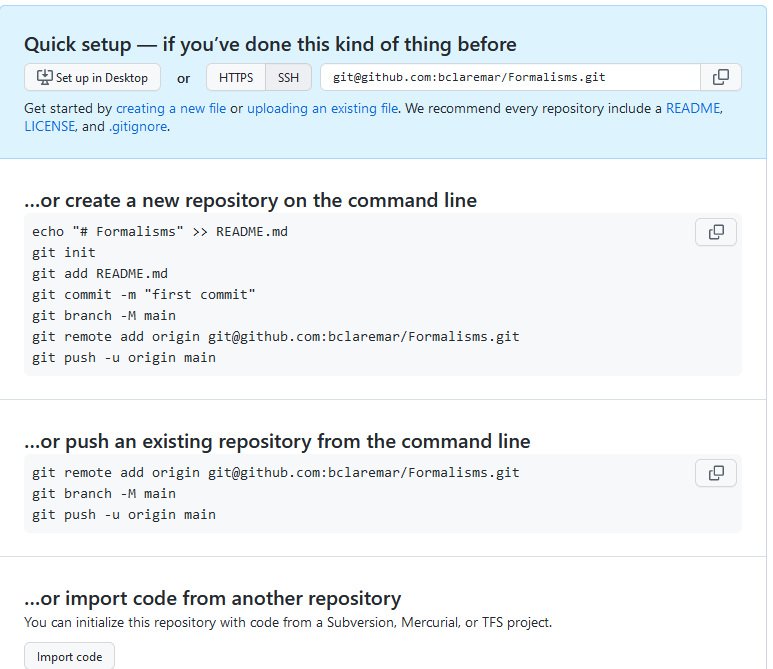
Don’t do anything yet
What this means is that we have now an empty project with either an HTTPS or an SSH address: click on the HTTPS and SSH buttons to see what happens.
Pushing our Formalisms repository to GitHub
To push changes to the project please select SSH. For this to work you will need your SSH keys configured.
We now want to try the second option that GitHub suggests:
… or push an existing repository from the command line
Now go to your “Formalisms” repo on your computer.
Check that you are in the right place with
git status.Copy paste the three lines to the terminal and execute those, in my case (you need to replace the “user” part and possibly also the repository name):
$ git remote add origin git@github.com:<user>/Formalisms.git
$ git branch -M main
$ git push -u origin main
The meaning of the above lines:
Add a remote reference with the name “origin”
Rename current branch to “main”
Push branch “main” to “origin”
You should now see something like:
Enumerating objects: 7, done.
Counting objects: 100% (7/7), done.
Delta compression using up to 8 threads
Compressing objects: 100% (7/7), done.
Writing objects: 100% (7/7), 846 bytes | 846.00 KiB/s, done.
Total 7 (delta 1), reused 0 (delta 0), pack-reused 0
remote: Resolving deltas: 100% (1/1), done.
To github.com:bclaremar/Formalisms.git
 * [new branch]      main -> main
branch 'main' set up to track 'origin/main'.
If you get errors
If you instead get something like the below, your SSH keys are not correctly configured.
git@github.com: Permission denied (publickey).
fatal: Could not read from remote repository.

Please make sure you have the correct access rights
and the repository exists.
If ssh -T git@github.com gives an error, this is the case.
Approximate steps
ssh-keygen -t ed25519 -C "email address"
eval "$(ssh-agent -s)"
ssh-add ~/.ssh/id_ed25519
Hope you can fix this in Lunch Break. Follow the rest by listening for now.
Reload your GitHub project website and - taa-daa - your commits should now be online!
What just happened? Think of publishing a repository as uploading the .git part online.
Cloning a repository
Now other people can clone this repository and contribute changes.
At this point only a brief demo - if you copy the SSH or HTTPS address, you can clone repositories like this (again adapt the “namespace/repository.git” part):
$ git clone git@github.com:<user>/project.git
This creates a directory called “project” unless it already exists. You can also specify the target directory on your computer:
$ git clone git@github.com:<user>/project.git myproject
What just happened? Think of cloning as downloading the .git part to your
computer. After downloading the .git part the branch pointed to by HEAD is
automatically checked out.
Keypoints
A repository can have one or multiple remotes (we will revisit these later).
Local branches often track remote branches.
A remote serves as a full backup of your work.
Working on GitHub
You can do basically the same work at GitHub as in your local git repo
The graphical view makes it easier to work with in everyday editing work at least.
Depends on your own preferences of course.
Here your commit each file at a time with the “commit button”. No staging that is.
GitHub Actions are workflows defined by you, like:
for automatic testing after each commit (Used on Thursday)
for GitHub Pages, briefly covered in last session today.
Summary
Now we know how to save snapshots:
$ git add <file(s)>
$ git commit
And this is what we do as we program.
Every state is then saved and later we will learn how to go back to these “checkpoints” and how to undo things.
$ git init    # initialize new repository
$ git add     # add files or stage file(s)
$ git commit  # commit staged file(s)
$ git status  # see what is going on
$ git log     # see history
$ git diff    # show unstaged/uncommitted modifications
$ git show    # show the change for a specific commit
$ git mv      # move tracked files
$ git rm      # remove tracked files
Git is not ideal for large binary files (for this consider http://git-annex.branchable.com).
Keypoints
Initializing a Git repository is simple: git init.
Commits should be used to tell a story.
Git uses the .git folder to store the snapshots.
Don’t be afraid to stage and commit often. Better too often than not often enough.
A branch is a division unit of work, to be merged with other units of work.
A tag is a pointer to a moment in the history of a project.
A repository can have one or multiple remotes (we will revisit these later).
Local branches often track remote branches.
A remote serves as a full backup of your work.