Jupyter on compute nodes
Start Jupyter via an interactive session from the remote desktop website.
Teaching goals are:
Learners have started Jupyter via an interactive session from the remote desktop website.
Lesson plan (10 minutes in total):
- 1 mins: prior knowledge
What is Jupyter?
Why can’t I run it on a login node?
Why can’t I run it on a compute node node?
1 mins: presentation
7 mins: challenge
1 mins: recap
Compute allocations in this workshop
Rackham:
naiss2024-22-107Kebnekaise:
hpc2n2024-025
Storage space for this workshop
Rackham:
/proj/r-py-jlKebnekaise:
/proj/nobackup/hpc2n2024-025
Introduction
Jupyter is web application that allows literature programming for Python. That is, Jupyter allows to create documents where Python code is shown and run and its results shown, surrounded by written text (e.g. English).
Additionally, Jupyter allows to share files and hence includes a file manager.
Jupyter is:
started and running on a server, for example, an interactive node
displayed in a web browser, such as
firefox.
Jupyter can be slow when using a remote desktop website
(e.g. rackham-gui.uppmax.uu.se or kebnekaise-tl.hpc2n.umu.se).
For HPC2N, as
JupyterLabis only accessible from within HPC2N’s, there is no way to improve itFor UPPMAX, one can use a locally installed ThinLinc client to speed up Jupyter. See the UPPMAX documentation on ThinLinc on how to install the ThinLinc client locally
UPPMAX procedure
UPPMAX procedure step 1: login to a remote desktop
Login to a remote desktop:
Login to the remote desktop website at
rackham-gui.uppmax.uu.seLogin to your local ThinLinc client
UPPMAX procedure step 2: start an interactive session
Start a terminal. Within that terminal, start an interactive session from the login node (change to the correct NAISS project ID)
For Rackham
$ interactive -A <naiss-project-id> -t 4:00:00
For Snowy
$ interactive -M snowy -A <naiss-project-id> -t 4:00:00
UPPMAX procedure step 3: start Jupyter in the interactive session
Within your terminal with the interactive session, load a modern Python module:
module load python/3.11.8
Then, start jupyter-notebook (or jupyter-lab):
jupyter-notebook --ip 0.0.0.0 --no-browser
Leave this terminal open.
UPPMAX procedure step 4: connect to the running notebook
The terminal will display multiple URLs.
If you use the remote desktop website:
start
firefoxon the remote desktopbrowse to the first URL, which will be similar to
file://domus/h1/[username]/.local/share/jupyter/runtimejpserver-[number]-open.html
In both cases, you can access Jupyter from your local computer
start
firefoxon your local computerbrowse to the second URL, which will be similar to
http://r486:8888/?token=5c3aeee9fbfc75f7a11c4a64b2b5b7ec49622231388241c2
On own computer
- If you use ssh to connect to Rackham, you need to forward the port of the interactive node to your local computer.
On Linux or Mac this is done by running in another terminal. Make sure you have the ports changed if they are not at the default
8888.
$ ssh -L 8888:r486:8888 username@rackham.uppmax.uu.se

 - If you use Windows it may be better to do this in the PowerShell instead of a WSL2 terminal.
 - If you use PuTTY - you need to change the settings in "Tunnels" accordingly (could be done for the current connection as well).
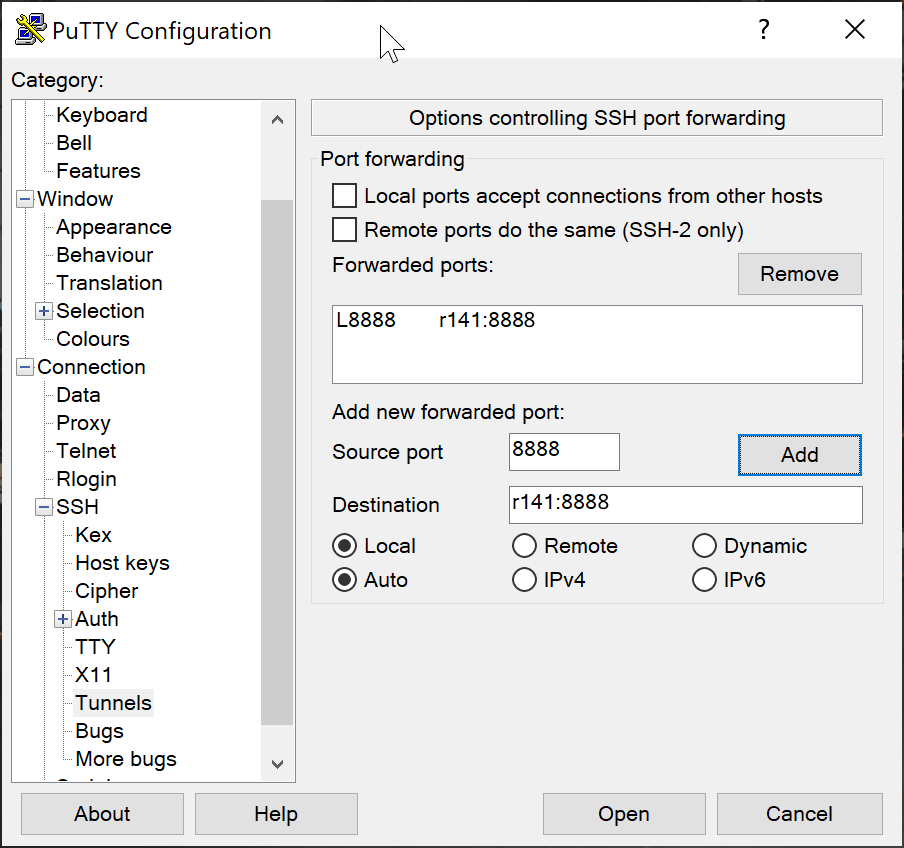
[SSH port forwarding](https://uplogix.com/docs/local-manager-user-guide/advanced-features/ssh-port-forwarding)
On your computer open the address you got but replace r486 with localhost i.e.
http://localhost:8888/?token=5c3aeee9fbfc75f7a11c4a64b2b5b7ec49622231388241c2
or
http://127.0.0.0:8888/?token=5c3aeee9fbfc75f7a11c4a64b2b5b7ec49622231388241c2
This should bring the jupyter interface on your computer and all calculations and files will be on Rackham.
Warning
Running Jupyter in a virtual environment
You could also use jupyter (-lab or -notebook) in a virtual environment.
If you decide to use the –system-site-packages configuration you will get jupyter from the python modules you created your virtual environment with.
However, you won’t find your locally installed packages from that jupyter session. To solve this reinstall jupyter within the virtual environment by force:
$ pip install -I jupyter
and run:
$ jupyter-notebook
Be sure to start the kernel with the virtual environment name, like “Example”, and not “Python 3 (ipykernel)”.
Kebnekaise
Since the JupyterLab will only be accessible from within HPC2N’s domain, it is by far easiest to do this from inside ThinLinc, so this is highly recommended. You can find information about using ThinLinc at HPC2N here: https://www.hpc2n.umu.se/documentation/guides/thinlinc
At HPC2N, you currently need to start JupyterLab on a specific compute node. To do that you need a submit file and inside that you load the JupyterLab module and its prerequisites (and possibly other Python modules if you need them - more about that later).
To see the currently available versions, do
module spider JupyterLab
You then do
module spider JupyterLab/<version>
for a specific <version> to see which prerequisites should be loaded first.
Example, loading ``JupyterLab/4.0.5``
module load GCC/12.3.0 JupyterLab/4.0.5
Making the submit file
Something like the file below will work. Remember to change the project id after the course, how many cores you need, and how long you want the JupyterLab to be available:
#!/bin/bash
#SBATCH -A hpc2n2024-025
# This example asks for 1 core
#SBATCH -n 1
# Ask for a suitable amount of time. Remember, this is the time the Jupyter notebook will be available! HHH:MM:SS.
#SBATCH --time=05:00:00

# Clear the environment from any previously loaded modules
module purge > /dev/null 2>&1

# Load the module environment suitable for the job
module load GCC/12.3.0 JupyterLab/4.0.5

# Start JupyterLab
jupyter lab --no-browser --ip $(hostname)
Where the flags used to the Jupyter command has the following meaning (you can use Jupyter --help and Jupyter lab --help> to see extra options):
lab: This launches JupyterLab computational environment for Jupyter.
–no-browser: Prevent the opening of the default url in the browser.
–ip=<IP address>: The IP address the JupyterLab server will listen on. Default is ‘localhost’. In the above example script I use
$(hostname)to get the content of the environment variable for the hostname for the node I am allocated by the job.
Note again that the JupyterLab is only accessible from within the HPC2N domain, so it is easiest to work on the ThinLinc.
Submit the above submit file. Here I am calling it
MyJupyterLab.sh
sbatch MyJupyterLab.sh
Get the URL from the SLURM output file.
Wait until the job gets resources allocated. Check the SLURM output file; when the job has resources allocated it will have a number of URLs inside at the bottom.
The SLURM output file is as default named slurm-<job-id>.out where you get the <job-id> when you submit the SLURM submit file (as in item 3. here).
NOTE: Grab the URL with the hostname since the localhost one requires you to login to the compute node and so will not work!
The file will look similar to this:
b-an03 [~]$ cat slurm-24661064.out
[I 2024-03-09 15:35:30.595 ServerApp] Package jupyterlab took 0.0000s to import
[I 2024-03-09 15:35:30.617 ServerApp] Package jupyter_lsp took 0.0217s to import
[W 2024-03-09 15:35:30.617 ServerApp] A `_jupyter_server_extension_points` function was not found in jupyter_lsp. Instead, a `_jupyter_server_extension_paths` function was found and will be used for now. This function name will be deprecated in future releases of Jupyter Server.
[I 2024-03-09 15:35:30.626 ServerApp] Package jupyter_server_terminals took 0.0087s to import
[I 2024-03-09 15:35:30.627 ServerApp] Package notebook_shim took 0.0000s to import
[W 2024-03-09 15:35:30.627 ServerApp] A `_jupyter_server_extension_points` function was not found in notebook_shim. Instead, a `_jupyter_server_extension_paths` function was found and will be used for now. This function name will be deprecated in future releases of Jupyter Server.
[I 2024-03-09 15:35:30.627 ServerApp] jupyter_lsp | extension was successfully linked.
[I 2024-03-09 15:35:30.632 ServerApp] jupyter_server_terminals | extension was successfully linked.
[I 2024-03-09 15:35:30.637 ServerApp] jupyterlab | extension was successfully linked.
[I 2024-03-09 15:35:30.995 ServerApp] notebook_shim | extension was successfully linked.
[I 2024-03-09 15:35:31.020 ServerApp] notebook_shim | extension was successfully loaded.
[I 2024-03-09 15:35:31.022 ServerApp] jupyter_lsp | extension was successfully loaded.
[I 2024-03-09 15:35:31.023 ServerApp] jupyter_server_terminals | extension was successfully loaded.
[I 2024-03-09 15:35:31.027 LabApp] JupyterLab extension loaded from /hpc2n/eb/software/JupyterLab/4.0.5-GCCcore-12.3.0/lib/python3.11/site-packages/jupyterlab
[I 2024-03-09 15:35:31.027 LabApp] JupyterLab application directory is /cvmfs/ebsw.hpc2n.umu.se/amd64_ubuntu2004_skx/software/JupyterLab/4.0.5-GCCcore-12.3.0/share/jupyter/lab
[I 2024-03-09 15:35:31.028 LabApp] Extension Manager is 'pypi'.
[I 2024-03-09 15:35:31.029 ServerApp] jupyterlab | extension was successfully loaded.
[I 2024-03-09 15:35:31.030 ServerApp] Serving notebooks from local directory: /pfs/stor10/users/home/b/bbrydsoe
[I 2024-03-09 15:35:31.030 ServerApp] Jupyter Server 2.7.2 is running at:
[I 2024-03-09 15:35:31.030 ServerApp] http://b-cn1520.hpc2n.umu.se:8888/lab?token=c45b36c6f22322c4cb1e037e046ec33da94506004aa137c1
[I 2024-03-09 15:35:31.030 ServerApp]     http://127.0.0.1:8888/lab?token=c45b36c6f22322c4cb1e037e046ec33da94506004aa137c1
[I 2024-03-09 15:35:31.030 ServerApp] Use Control-C to stop this server and shut down all kernels (twice to skip confirmation).
[C 2024-03-09 15:35:31.039 ServerApp]

 To access the server, open this file in a browser:
     file:///pfs/stor10/users/home/b/bbrydsoe/.local/share/jupyter/runtime/jpserver-121683-open.html
 Or copy and paste one of these URLs:
     http://b-cn1520.hpc2n.umu.se:8888/lab?token=c45b36c6f22322c4cb1e037e046ec33da94506004aa137c1
     http://127.0.0.1:8888/lab?token=c45b36c6f22322c4cb1e037e046ec33da94506004aa137c1
[I 2024-03-09 15:35:31.078 ServerApp] Skipped non-installed server(s): bash-language-server, dockerfile-language-server-nodejs, javascript-typescript-langserver, jedi-language-server, julia-language-server, pyright, python-language-server, python-lsp-server, r-languageserver, sql-language-server, texlab, typescript-language-server, unified-language-server, vscode-css-languageserver-bin, vscode-html-languageserver-bin, vscode-json-languageserver-bin, yaml-language-server
To access the server, go to
file:///.local/share/jupyter/runtime/jpserver-<newest>-open.html
from a browser within the ThinLinc session. <newest> is a number that you find by looking in the directory .local/share/jupyter/runtime/ under your home directory.
Or, to access the server you can copy and paste this URLs from the file:
http://b-cn1520.hpc2n.umu.se:8888/lab?token=c45b36c6f22322c4cb1e037e046ec33da94506004aa137c1
NOTE of course, do not copy the above, but the similar looking one from the file you get from running the batch script!!!
Start a webbrowser within HPC2N (ThinLinc interface). Open the html or put in the URL you grabbed, including the token:
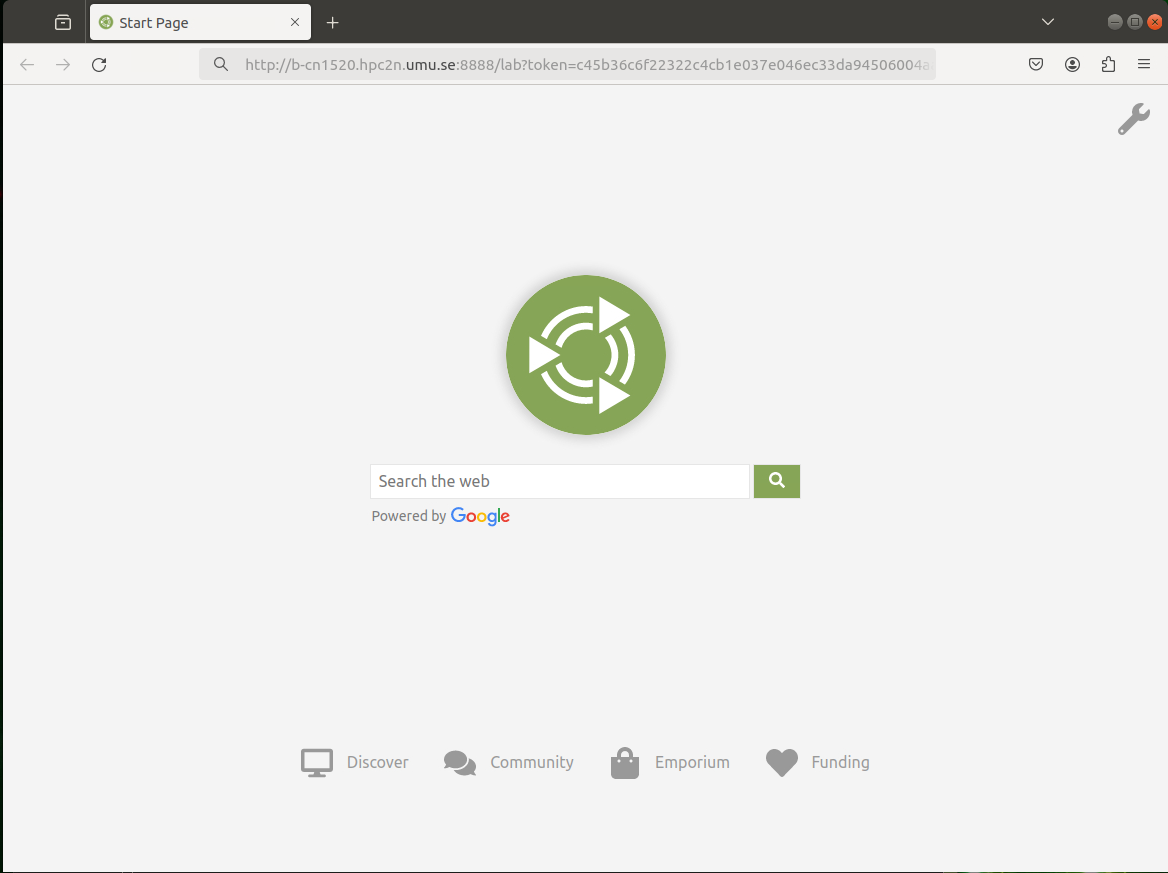
After a few moments JupyterLab starts up:
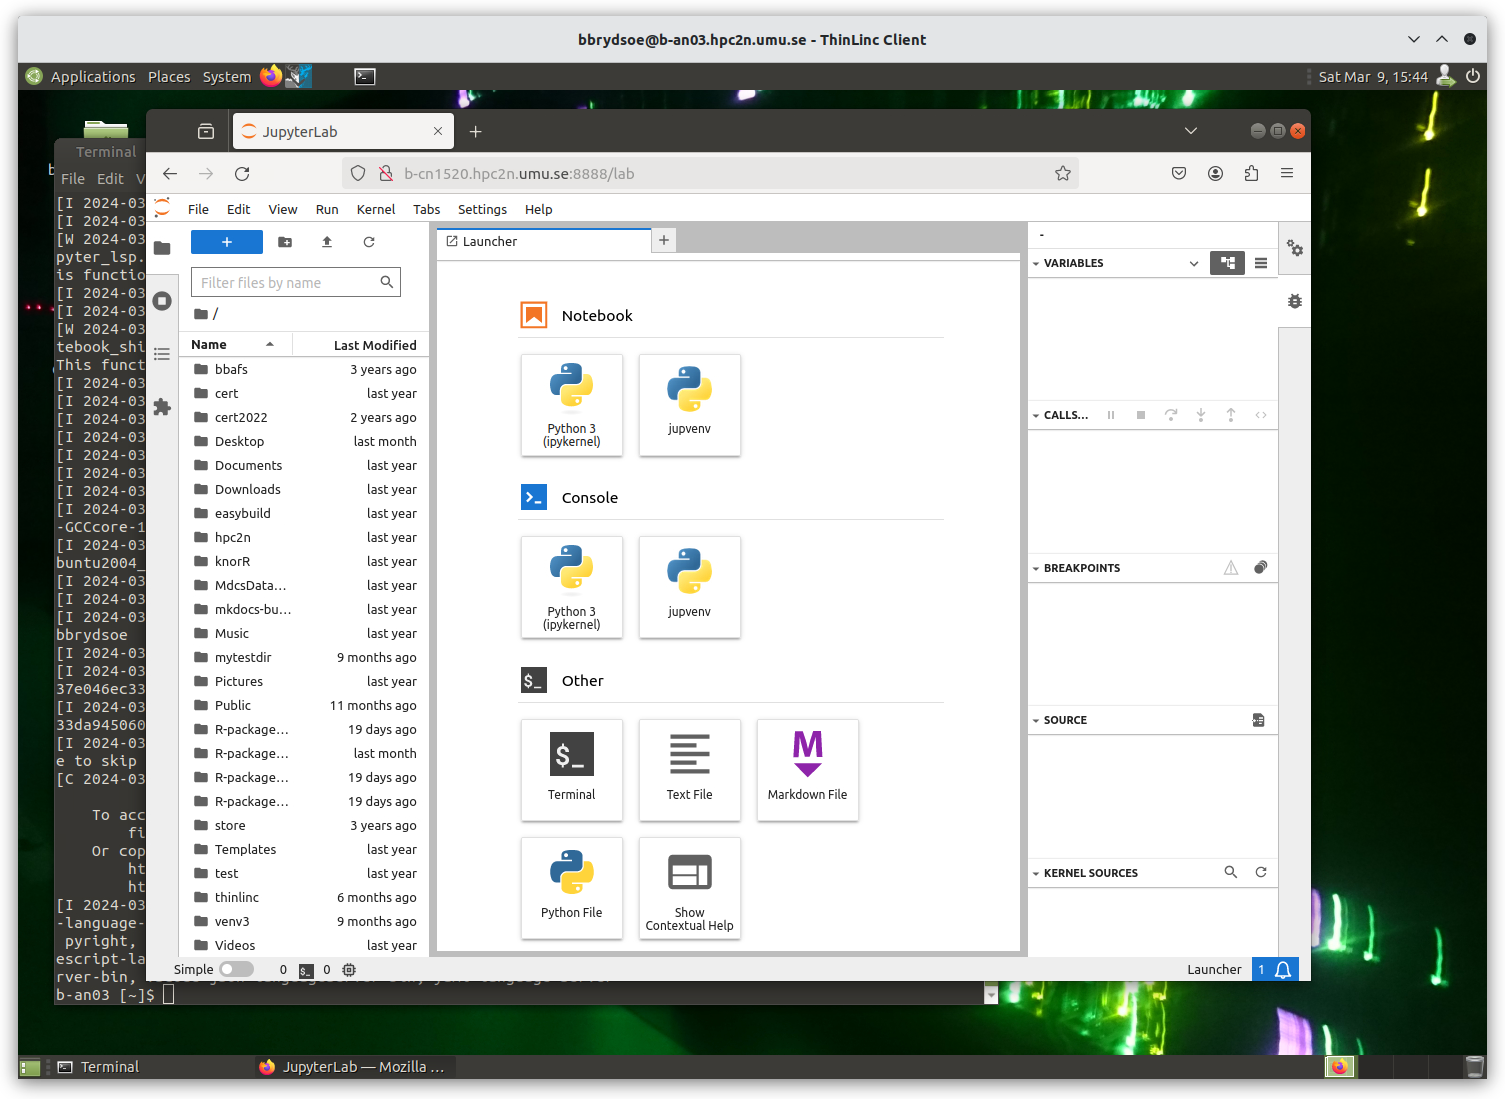
You shut it down from the menu with “File” > “Shut Down”
If you need extra Python modules and these modules are already installed at HPC2N, you can just load them. It is easiest to do so before you start the JupyterLab, inside the submit file.
Example, loading JupyterLab/4.0.5, its prerequisites, and the modules for SciPy-bundle (mpi4py, numpy, pandas, scipy etc.) and matplotlib:
#!/bin/bash
#SBATCH -A hpc2n2024-025
# This example use 1 core
#SBATCH -n 1
# Ask for a suitable amount of time. Remember, this is the time the Jupyter notebook will be available! HHH:MM:SS.
#SBATCH --time=01:00:00

# Clear the environment from any previously loaded modules
module purge > /dev/null 2>&1

# Load the module environment suitable for the job
module load GCC/12.3.0 JupyterLab/4.0.5 SciPy-bundle/2023.07 matplotlib/3.7.2

# Start JupyterLab
jupyter lab --no-browser --ip $(hostname)
Running JupyterLab with some own-installed Python packages requires you to use a virtual environment and your own Jupyter kernel. This is not as difficult as it may sound.
Example Own-installed pyDOE and torch. Using JupyterLab/3.4.2
First we need to load the modules that we need for our own-installed packages, and for the JupyterLab.
pyDOE and torch has some prerequisites, some of which are already installed at HPC2N. We will start by loading the available prerequisite modules:
module load GCC/10.3.0 JupyterLab/3.2.8 OpenMPI/4.1.1 SciPy-bundle/2021.05 matplotlib/3.4.2
We now need to create a virtual environment (venv) to install our own packages in. I am placing it in the Public directory under my home directory ($HOME), but you could instead place it in your project storage. I am calling the venv “jupvenv”, but you can call it what you want:
python -m venv $HOME/Public/jupvenv
Activate the venv
source $HOME/Public/jupvenv/bin/activate
Install ipykernel in the venv. This is needed to be able to make your own Jupyter kernel which can use the own-installed Python packages
pip install --no-cache-dir --no-build-isolation ipykernel
NOTE! It may complain of missing prerequisites. If so, instead install:
pip install --no-cache-dir --no-build-isolation pyparsing pytz jinja2 packaging webencodings cffi babel jsonschema requests tomlkit wheel ipykernel
Install your Python packages in the venv, here pyDOE and torch
pip install --no-cache-dir --no-build-isolation pyDOE torch
Install the new kernel in Jupyter (here called jupvenv)
python -m ipykernel install --user --name=jupvenv
Check list of kernels to see your new kernel
jupyter kernelspec list
Later you can remove the kernel if you feel like, using this:
jupyter kernelspec uninstall jupvenv
Now make a submit file as before. Something like this should work:
#!/bin/bash
#SBATCH -A hpc2n2024-025
# Here allocating 1 core - change as suitable for your case
#SBATCH -n 1
# Ask for a suitable amount of time. Remember, this is the time the Jupyter notebook will be available!
#SBATCH --time=01:00:00

# Clear the environment from any previously loaded modules
module purge > /dev/null 2>&1

# Load the module environment suitable for the job
module load GCC/10.3.0 JupyterLab/3.2.8 OpenMPI/4.1.1 SciPy-bundle/2021.05 matplotlib/3.4.2

# Activate the venv you installed your own Python packages to
source $HOME/Public/jupvenv/bin/activate

# Start JupyterLab
jupyter lab --no-browser --ip $(hostname)
Submit the above submit file (here I named it MyJupvenv.sh).
sbatch MyJupvenv.sh
You get the <job-id> when you do the above command.
Check the SLURM output file (slurm-<job.id>.out); grab the URL with the hostname as described in the first part of this document, since the localhost one requires you to login to the compute node.
Start a webbrowser within HPC2N (ThinLinc interface). Put in the URL you grabbed, including the token.
Inside JupyterLab, start the new kernel. Just click the launcher for that one if no other kernel is running.
If a kernel is running (shown under kernels), then shut down that kernel and click “Kernel” in the menu, and then “Change kernel”. Pick your kernel from the drop-down menu.
You can now run your files etc. with the own-installed Python packages available.
NOTE! Sometimes it is still running on the default kernel. If so, Click the 3 little dots in the right side of the editor-window for the program and pick your kernel. Then rerun your files.
Links
The Jupyter project contains a lot of information and inspiration